Italian Tiramisu Gluten Free Version with Almond Sponge and Light Mascarpone Cream
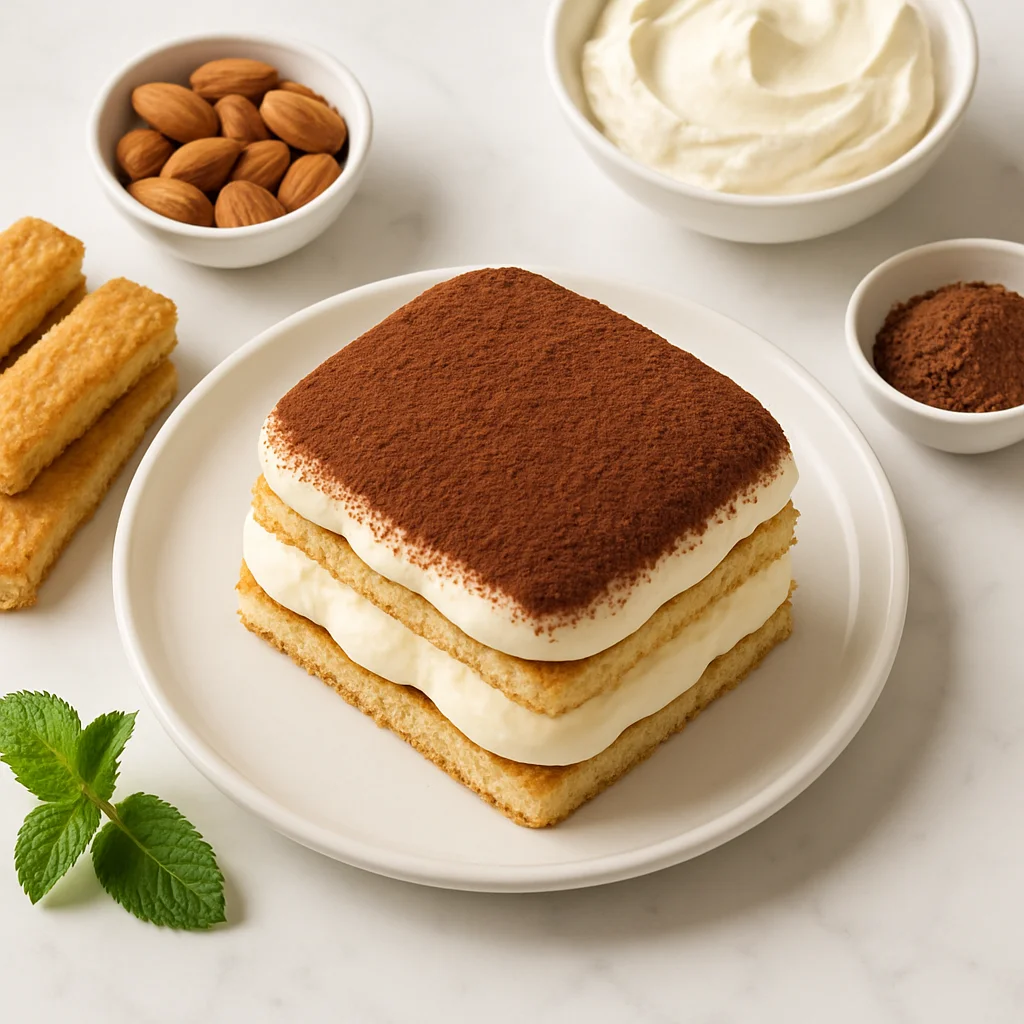
If you have been searching for an authentic Italian tiramisu gluten free version that does not sacrifice flavour or elegance, you have found exactly the right recipe. Traditional tiramisu is one of Italy's most beloved desserts, but it typically relies on wheat-based ladyfinger biscuits, generous amounts of refined sugar, and heavy amounts of full-fat mascarpone combined with egg yolks and whipped cream. While undeniably delicious, that classic combination can feel heavy, overly sweet, and completely off-limits for anyone following a gluten free diet. This recipe changes all of that. By rethinking each component from the ground up, this Italian tiramisu gluten free version delivers the same layered, coffee-soaked, creamy experience you expect from a great tiramisu, but with a genuinely healthier nutritional profile that health-conscious home bakers can feel good about.
The foundation of this recipe is a set of homemade almond flour sponge fingers. Almond flour brings a naturally nutty, slightly sweet flavour that pairs beautifully with espresso, and it provides a meaningful boost in protein and healthy fats compared to plain wheat flour. These sponge fingers are baked until lightly golden, giving them just enough structure to absorb the coffee soak without falling apart, which is exactly what you need for a classic tiramisu texture. The biscuits are lightly sweetened with coconut sugar rather than refined white sugar, which has a lower glycaemic index and adds a subtle caramel undertone that complements the espresso beautifully.
If you prefer a shortcut, certified gluten free ladyfinger biscuits (such as those made by Schar) can be used in place of the homemade sponge fingers. They are an excellent backup option when time is short, though homemade almond flour fingers deliver superior flavour and a better nutritional profile.
For the mascarpone cream, this recipe takes a lighter approach by blending reduced-fat mascarpone with thick Greek yogurt. This substitution slashes the calorie count significantly while adding a pleasant tanginess that actually enhances the overall flavour complexity of the dessert. The cream is sweetened with pure maple syrup rather than white sugar, keeping the sugar content lower while using a more natural, minimally processed sweetener. Pasteurised egg whites, whipped to soft peaks, are folded through the mixture to give the cream its classic airy, cloud-like texture without using raw egg yolks, making this version safer to serve without cooking. Authentic Italian tiramisu traditionally uses raw egg yolks for richness, but using pasteurised whites here achieves airiness with zero food safety concerns, an important consideration when serving guests or children.
The coffee soak uses a combination of strong brewed espresso and a small amount of pure vanilla extract. There is no added sugar or Marsala wine in this version, keeping the alcohol and sugar content to a minimum without losing any of the signature espresso intensity that defines a great tiramisu. For an adult version, a small splash of coffee liqueur such as Kahlúa, dark rum, or Marsala wine can be stirred into the espresso soak for a more traditional flavour, but the base recipe is completely alcohol-free and suitable for all ages.
One of the most common concerns people have when attempting a gluten free tiramisu is texture. Gluten free baked goods can sometimes turn out dense, crumbly, or gummy, but the almond flour sponge fingers in this recipe use a careful balance of almond flour, tapioca starch, and beaten eggs to achieve a light, slightly springy texture that holds up beautifully through the soaking and layering process. The tapioca starch is a key ingredient here, it binds the batter, reduces crumbling, and gives the finished biscuit a pleasant chew that closely mimics traditional wheat-based ladyfingers. Crucially, the dipping time must be kept very brief, no more than 2 seconds per side, because almond flour fingers absorb liquid significantly faster than wheat-based ones and can turn soggy if over-dipped.
Assembly is straightforward and follows the classic tiramisu method of alternating layers of coffee-soaked sponge fingers with generous portions of the mascarpone cream. The dessert is then finished with a generous dusting of unsweetened cocoa powder, which adds a deep, slightly bitter contrast to the sweet cream and is completely gluten free. The finished tiramisu needs several hours in the refrigerator to set properly, allowing the layers to meld together and the flavours to develop fully. This makes it an ideal make-ahead dessert for dinner parties, gatherings, or weekend meal prep.
From a nutritional standpoint, this Italian tiramisu gluten free version comes in significantly lower in calories, refined sugar, and total carbohydrates than a standard tiramisu, while offering more protein per serving thanks to the almond flour, Greek yogurt, and egg whites. It is also naturally gluten free, making it safe and delicious for those with coeliac disease or gluten sensitivity, provided all labelled ingredients are certified gluten free to avoid cross-contamination. Whether you are new to gluten free baking or a seasoned pro looking for a lighter take on a classic Italian dessert, this recipe is a must-try.
Ingredients
- 200 g blanched almond flour (finely milled for best texture — coarser almond meal will give a grainier, denser sponge finger)
- 30 g tapioca starch (also called tapioca flour — essential for binding and preventing crumble; arrowroot powder is a 1:1 substitute)
- 1 tsp baking powder (ensure certified gluten free as some brands contain wheat starch as a filler)
- 1 tsp fine sea salt
- 3 large eggs (separated, at room temperature — cold eggs are harder to separate cleanly and whites whip less effectively when cold)
- 3 tbsp coconut sugar (for the sponge fingers — lower glycaemic index than white sugar and adds a subtle caramel note; light brown sugar works as a 1:1 swap)
- 1 tsp pure vanilla extract (divided use — half goes into the sponge fingers, half into the mascarpone cream)
- 250 ml strong brewed espresso (cooled to room temperature — the stronger the coffee, the better the flavour; a double-strength brew or 3 to 4 espresso shots topped up with a little water works well)
- 300 g reduced-fat mascarpone cheese (at room temperature — cold mascarpone can turn grainy when beaten; full-fat mascarpone can be used for a richer result)
- 200 g full-fat plain Greek yogurt (at least 5% fat for best texture — low-fat yogurt contains more water and can make the cream too loose)
- 3 tbsp pure maple syrup (adjust to taste — grade A amber maple syrup has a mild flavour that does not overpower the coffee and cream)
- 3 large pasteurised egg whites (from a carton or pasteurised in-shell eggs — using pasteurised whites eliminates the food safety risk associated with raw egg traditional tiramisu recipes)
- 1 tsp cream of tartar (stabilises the egg whites so they hold their stiff peaks longer and are easier to fold without deflating)
- 3 tbsp unsweetened cocoa powder (for dusting — use Dutch-processed cocoa for a deeper, less bitter flavour, or natural cocoa for a more intense edge; ensure certified gluten free)
- 1 tbsp dark chocolate (finely grated, optional garnish — use 70% cocoa or above for the best contrast against the sweet cream)
Instructions
- 1
Preheat your oven to 180°C (160°C fan / 350°F). Line two large baking sheets with parchment paper. In a medium bowl, whisk together the almond flour, tapioca starch, baking powder, and sea salt until evenly combined and free of lumps.
Sifting the almond flour helps remove any clumps and results in a smoother batter — do not skip this step, especially if your almond flour has been sitting in the bag for a while.
- 2
Separate the 3 eggs. Place the yolks in a large mixing bowl and the whites in a clean, grease-free stand mixer bowl. Add the coconut sugar and half the vanilla extract to the yolks and beat with an electric hand mixer for 2 to 3 minutes until the mixture is pale, thick, and slightly fluffy.
Make sure no yolk gets into the whites or they will not whip properly. Even a tiny speck of yolk can prevent stiff peaks from forming.
- 3
Beat the egg whites with a stand mixer fitted with a whisk attachment on medium speed until foamy, then increase to high and beat until stiff peaks form, about 3 to 4 minutes.
Wipe your bowl and whisk with a halved lemon or a splash of white vinegar before starting — this removes any invisible grease that would prevent the whites from whipping.
- 4
Fold the almond flour mixture into the egg yolk mixture in two additions, stirring gently to combine. Then fold in one third of the beaten egg whites using a spatula to lighten the batter, followed by the remaining whites in two more additions. Fold gently to preserve as much air as possible.
Use a large figure-eight motion when folding to keep the batter light and airy. Stop folding as soon as no streaks of egg white remain — over-folding will knock out the air and produce flat fingers.
- 5
Transfer the batter to a piping bag fitted with a plain round tip. Pipe finger-shaped lengths about 8 to 9 cm long and 2 cm wide onto the prepared baking sheets, spacing them slightly apart. You should get approximately 24 to 28 fingers.
If you do not have a piping bag, use a zip-lock bag with one corner snipped off. Aim for a consistent size so all the fingers bake evenly — uneven fingers will have some over-baked and some under-baked.
- 6
Bake the sponge fingers in the preheated oven for 16 to 18 minutes until lightly golden on top and firm to the touch. Allow them to cool completely on the baking sheets before handling — they will firm up further as they cool.
Do not rush cooling. Warm fingers will fall apart when dipped in espresso. They will feel fragile when they come out of the oven but firm up considerably as they cool — resist the urge to move them too early.
- 7
While the sponge fingers cool, prepare the mascarpone cream. In a large bowl, beat the reduced-fat mascarpone with an electric hand mixer until smooth. Add the Greek yogurt, maple syrup, and remaining half teaspoon of vanilla extract and beat again until fully combined and smooth. Taste and adjust sweetness if needed.
Make sure the mascarpone is at room temperature before beating — cold mascarpone can turn lumpy or grainy and will not blend smoothly with the yogurt.
- 8
In a clean bowl, beat the pasteurised egg whites with cream of tartar using an electric mixer on high speed until stiff peaks form, about 3 to 4 minutes. Gently fold the beaten whites into the mascarpone mixture in three additions until just combined and fluffy. Refrigerate for 15 minutes to firm up slightly.
Using pasteurised egg whites eliminates the food safety concerns associated with the raw egg yolks used in traditional Italian tiramisu, while still delivering the classic airy, cloud-like texture.
- 9
Pour the cooled espresso into a shallow bowl. Working quickly, dip each cooled sponge finger into the espresso for no more than 2 seconds per side — you want them soaked but not soggy. Arrange a single layer of dipped fingers in the base of an 8x6 inch (20x15 cm) serving dish.
Almond flour fingers absorb liquid significantly faster than wheat-based ladyfingers — keep the dipping time to no more than 2 seconds per side. You want them moist and flavourful, not waterlogged and falling apart.
- 10
Spread half of the mascarpone cream evenly over the first layer of sponge fingers using an offset spatula or the back of a spoon. Dust lightly with about one tablespoon of unsweetened cocoa powder.
An offset spatula gives the cleanest, most even spread — if you do not have one, the back of a large spoon works well. Spread right to the edges so every bite has an even ratio of cream to sponge.
- 11
Arrange a second layer of espresso-dipped sponge fingers on top of the cream, then spread the remaining mascarpone cream over the top in an even layer. Cover the dish with cling film and refrigerate for at least 4 hours, or ideally overnight, to allow the layers to set and the flavours to develop.
Overnight chilling produces the best flavour and texture — the layers meld together beautifully and the cream firms into clean, sliceable portions. If you can plan ahead, make this the day before serving.
- 12
When ready to serve, remove the tiramisu from the refrigerator and dust the top generously with the remaining unsweetened cocoa powder through a fine sieve. Add a scattering of finely grated dark chocolate if desired. Serve chilled, cut into 8 equal portions.
Dust with cocoa powder only just before serving to keep it looking vibrant and fresh. Cocoa dusted too far in advance can absorb moisture from the cream and turn dark and patchy.
Nutrition per serving
285kcal
Calories
11g
Protein
18g
Carbs
19g
Fat
3g
Fibre
10g
Sugar
115mg
Sodium
Pro Tips
- ✓
Make the sponge fingers a day ahead and store in an airtight container at room temperature, they firm up overnight and hold together far better during dipping. If you are short on time, certified gluten free ladyfinger biscuits (such as Schar brand) make an excellent shortcut substitute.
- ✓
Use the very best quality espresso you can brew for the soak. A strong, freshly pulled shot makes a noticeable difference to the depth of flavour in the finished tiramisu, weak coffee will result in a flat, underwhelming taste in every layer.
- ✓
Keep your dipping time to no longer than 2 seconds per side. Almond flour sponge fingers absorb liquid much faster than wheat-based ladyfingers, so even a couple of extra seconds in the espresso can result in soggy, structureless layers. Quick in, quick out.
- ✓
Make sure your mixing bowl and whisk are completely clean and free of any grease before beating the egg whites. Even a tiny trace of fat will prevent the whites from whipping to stiff peaks. Wipe the bowl with a halved lemon or a splash of white vinegar and dry thoroughly if in doubt.
- ✓
If your mascarpone cream feels too soft or runny after folding in the egg whites, refrigerate it for 20 to 30 minutes before assembling the tiramisu. This firms the mixture just enough to hold neat, defined layers that slice cleanly.
- ✓
For the cleanest, most restaurant-style slices, dip a sharp knife in hot water and wipe it completely dry between each cut. This prevents the mascarpone cream from dragging and keeps each portion looking immaculate on the plate.
Frequently Asked Questions
Variations
- •
Dairy Free Gluten Free Tiramisu
Replace the reduced-fat mascarpone and Greek yogurt with 500g of thick, chilled full-fat coconut cream. Whip until smooth and fluffy before folding in the beaten pasteurised egg whites. The result is lightly coconut-flavoured but still wonderfully creamy.
- •
Chocolate Orange Tiramisu
Add the zest of one large orange to the mascarpone cream and stir 1 tablespoon of raw cacao powder into the espresso soak for a mocha base. Finish with an extra dusting of cacao and orange zest curls.
- •
Berry Tiramisu
Swap the espresso soak for a mixture of strong hibiscus tea and a splash of raspberry juice for an alcohol-free, caffeine-free version. Layer with fresh raspberries or sliced strawberries between the cream layers for a fruity twist.
- •
Keto Tiramisu
Replace the coconut sugar in the sponge fingers with powdered erythritol and swap the maple syrup in the cream for liquid stevia to taste. Check that your cream of tartar and baking powder are keto-friendly. This brings the net carbs down significantly per serving.
Substitutions
- •Tapioca starch → Arrowroot powder (Use in an equal 1:1 ratio. Arrowroot gives a very similar binding effect and is also gluten free and paleo-friendly.)
- •Coconut sugar → Light brown sugar or monk fruit sweetener (Light brown sugar gives a more neutral flavour. Monk fruit sweetener works well for a lower-calorie option, use about 75% of the stated amount as it is sweeter than coconut sugar.)
- •Reduced-fat mascarpone → Full-fat cream cheese (Full-fat cream cheese is tangier than mascarpone but works well in this recipe. Blend until completely smooth before combining with the yogurt.)
- •Maple syrup → Honey or agave nectar (Both work as direct 1:1 substitutes. Honey adds a floral sweetness while agave is more neutral in flavour.)
- •Greek yogurt → Coconut yogurt (Use thick, strained coconut yogurt for a dairy free option. Make sure it has a firm texture to avoid the cream becoming too loose.)
- •Pasteurised egg whites → Aquafaba (chickpea brine) (Use 3 tablespoons of aquafaba per egg white. Beat with cream of tartar until stiff peaks form. The cream will be slightly less stable but still works well.)
🧊 Storage
Store the assembled tiramisu covered tightly with cling film in the refrigerator for up to 3 days. Do not leave at room temperature for more than 2 hours. The unassembled sponge fingers can be stored in an airtight container at room temperature for up to 2 days.
📅 Make Ahead
This dessert is ideal for making ahead. The sponge fingers can be baked up to 2 days in advance and stored in an airtight container. The fully assembled tiramisu should be made at least 4 hours before serving and is best prepared the day before to allow the layers to set completely and the flavours to meld. Dust with cocoa powder only just before serving.
More Italian Desserts Recipes
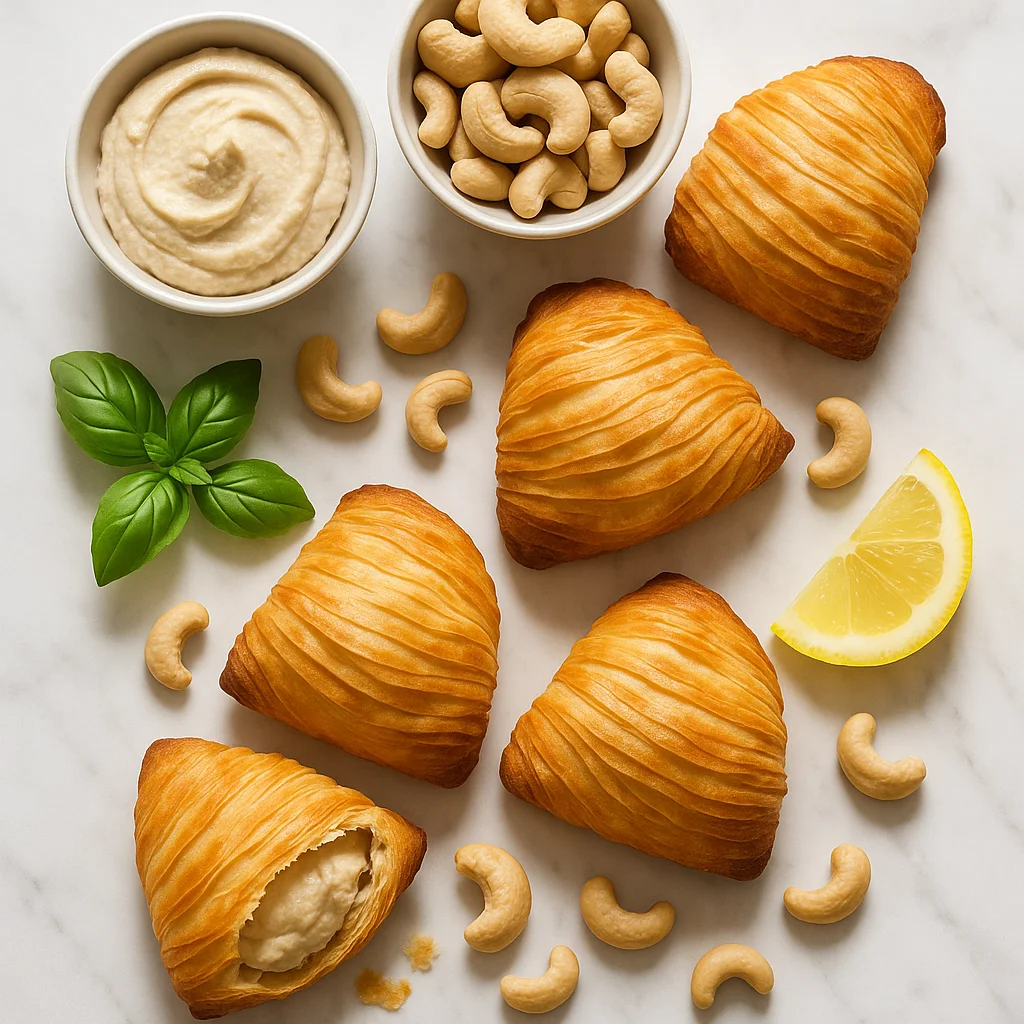
Italian Sfogliatelle Ricotta Dairy Free with Flaky Shells with Cashew Cream Filling
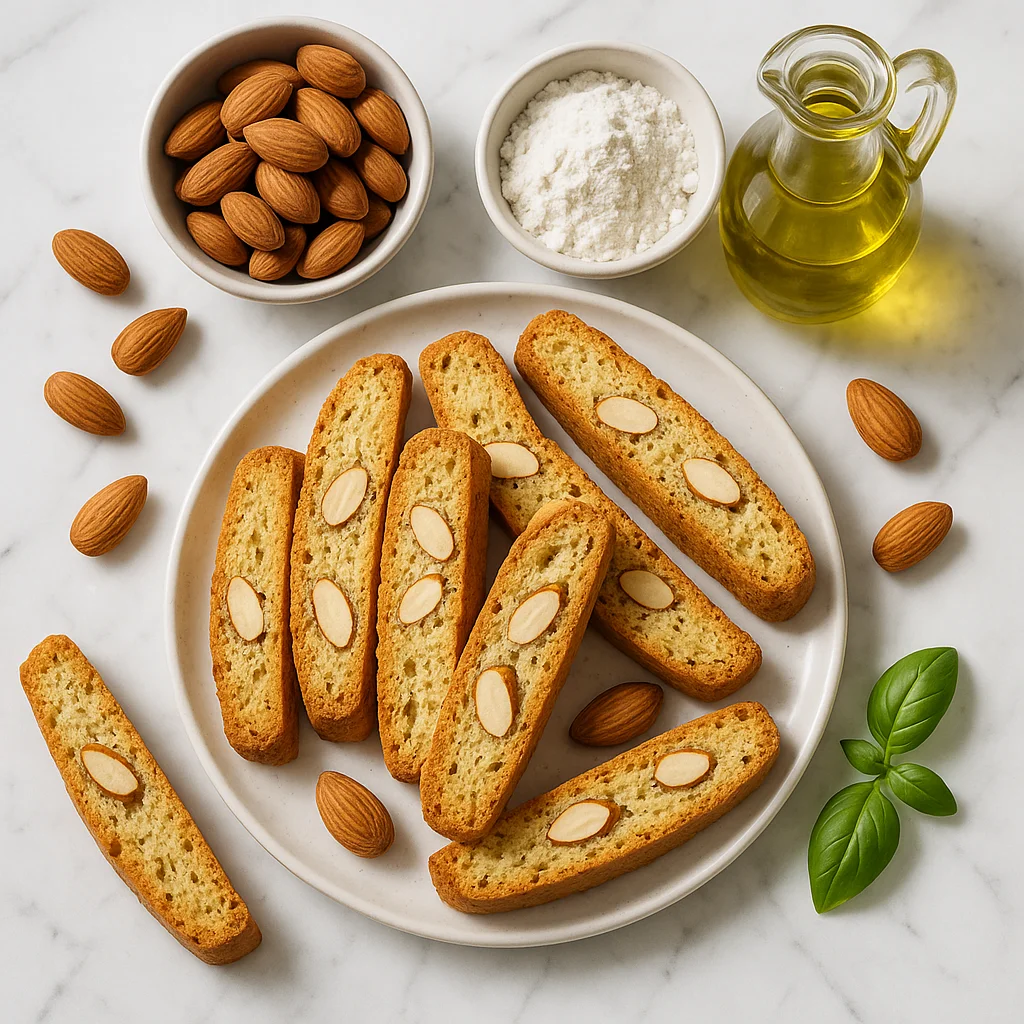
Italian Almond Biscotti Gluten Free with Crispy, Low-Sugar Classic
Italian Panna Cotta Low Calorie with Creamy Vanilla Dessert Under 120 Calories