Chapssal-Tteok Glutinous Rice Cake Dairy Free Recipe with Red Bean and Coconut
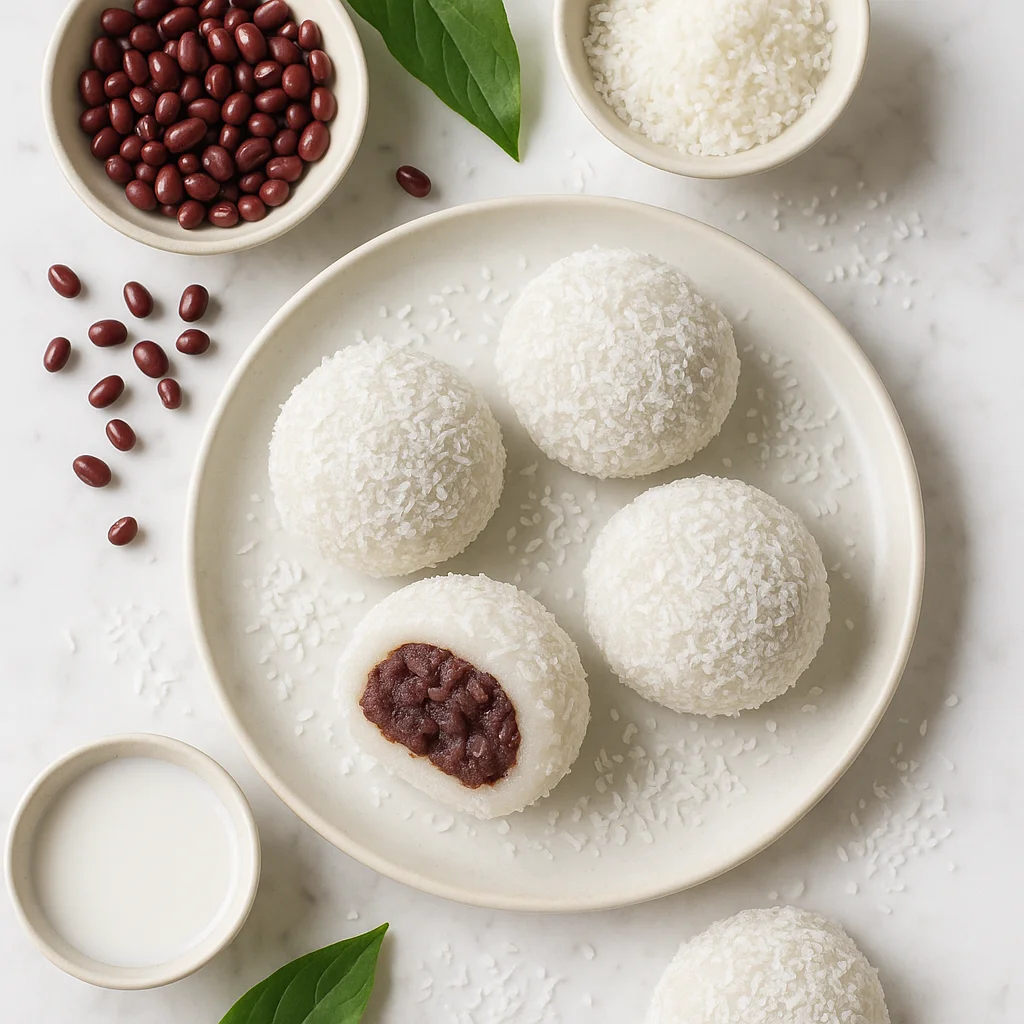
This version of chapssal-tteok is distinct from other Korean rice cakes in one specific way: the filling uses coconut cream instead of dairy. The result is a rice cake that is fully dairy-free while maintaining the essential character of the dish, a smooth, yielding glutinous rice shell wrapped around a filling that is sweet, slightly fatty and fragrant. Coconut cream pairs naturally with the neutral, slightly sticky exterior of the tteok in a way that feels appropriate rather than like a substitution. The red bean paste filling is made fresh rather than from a tin, which makes a noticeable difference to the depth of flavour.
Why this recipe works
Fresh red bean paste, made from azuki beans slow-cooked until very soft, drained and mashed with a small amount of coconut sugar, has an earthiness and complexity that commercial anko does not have. The addition of a small amount of coconut cream stirred through the still-warm paste produces a filling that is richer, smoother and more fragrant than the standard version. The glutinous rice flour exterior, mixed with warm water and a small amount of coconut cream, produces a dough that is soft and elastic and that takes on a very slight coconut flavour without the coconut dominating the overall taste.
Getting it right
Work the tteok dough while warm. The dough stiffens and becomes less pliable as it cools, making shaping progressively more difficult. Have the filling portions rolled and ready before you start wrapping.
Dust hands and work surface very generously with extra glutinous rice flour or potato starch throughout the shaping process. The dough is inherently sticky and requires constant re-dusting to manage.
Common mistakes
Making the dough shell too thin in an attempt to maximise the filling produces a tteok that tears during shaping and exposes the filling. An even thickness of about five millimetres around the filling is the correct target.
Not cooking the azuki beans long enough produces a granular, gritty paste that is unpleasant in texture. The beans should be fully soft and easy to mash smoothly before you begin the paste.
Substitutions
Sweet potato paste, made from roasted and mashed purple sweet potato with a small amount of maple syrup, replaces the red bean for a sweeter, more vibrantly coloured filling. Smooth peanut butter mixed with coconut cream and a little honey makes a simpler, no-cook alternative filling.
Serving suggestion
Serve at room temperature on the day of making, lightly dusted with extra coconut flakes or toasted sesame seeds. Eat within four hours for the softest texture. Do not refrigerate as the cold hardens the glutinous rice significantly.
Ingredients
- 1 cup glutinous rice flour (also labelled sweet rice flour or chapssal garu, not regular rice flour)
- 0.5 cup full-fat coconut milk (well shaken, from a can)
- 2 tablespoons pure maple syrup (grade A or B, adjust to taste)
- 1 pinch fine sea salt
- 0.8 cup dried adzuki beans (soaked overnight and drained)
- 2 tablespoons coconut sugar (for the red bean filling)
- 0.5 teaspoon vanilla extract (for the red bean filling)
- 3 tablespoons roasted soybean powder (kinako or injeolmi powder, for dusting. Cornstarch works as a substitute)
- 1 teaspoon cornstarch (extra, for dusting hands and work surface)
Instructions
- 1
Start by making the red bean filling. Drain the soaked adzuki beans and place them in a small saucepan. Cover with fresh water by about 5 centimetres and bring to a boil over medium-high heat. Reduce to a gentle simmer, cover and cook for 40 to 50 minutes until the beans are very soft and easily mashed between your fingers.
Soaking the beans overnight cuts cooking time significantly and improves digestibility.
- 2
Drain most of the cooking liquid, leaving just a splash. Add the coconut sugar and vanilla extract, then mash the beans firmly with a fork or potato masher until you have a fairly smooth, thick paste. It does not need to be perfectly smooth. A little texture is lovely. Set the paste aside to cool completely, then divide it into 10 equal portions and roll each into a small ball. Refrigerate the balls for at least 15 minutes so they hold their shape.
Chilling the bean filling makes it much easier to wrap in the dough without it squishing out.
- 3
Make the rice dough. In a microwave-safe bowl, whisk together the glutinous rice flour, coconut milk, maple syrup and sea salt until completely smooth with no lumps remaining. The batter will be quite runny at this stage, which is normal.
Use a balloon whisk and take your time here. Any lumps in the raw batter become harder to smooth out once cooked.
- 4
Cover the bowl loosely with a damp piece of paper towel or microwave-safe plastic wrap, leaving a small gap for steam to escape. Microwave on full power for 1 minute. Remove and stir the mixture firmly with a silicone spatula, scraping the sides and bottom of the bowl.
- 5
Cover again with the same gap and microwave for a further 1 minute. Remove and stir vigorously for 2 to 3 minutes. The dough should now be thick, stretchy, slightly translucent and pulling away from the sides of the bowl. If it still looks raw or very sticky in the centre, microwave in 20 second bursts until cooked through.
The dough is done when it has lost its bright white colour and turned slightly glossy and translucent.
- 6
Dust a clean work surface generously with cornstarch. Dust your hands too. Transfer the hot dough onto the surface, taking care as it will be very hot. Divide the dough into 10 equal pieces using a dough scraper or sharp knife dusted with cornstarch.
Wet hands can also help if you find the dough sticking, though cornstarch gives a better finish.
- 7
Flatten one piece of dough in your palm into a rough circle about 7 to 8 centimetres wide. Place one chilled red bean ball in the centre. Gather the edges of the dough up and around the filling, pinching them firmly together at the top to seal. Roll gently between your palms to form a smooth round ball. Repeat with all remaining pieces.
Work quickly while the dough is still warm and pliable. If it cools too much and becomes hard to stretch, briefly warm the remaining dough in the microwave for 10 seconds.
- 8
Roll each finished rice cake in the roasted soybean powder until evenly coated. Place them on a parchment-lined tray, making sure they are not touching each other.
Generous coating with soybean powder prevents the cakes from sticking together and adds a wonderful nutty flavour.
Nutrition per serving
118kcal
Calories
3.8g
Protein
21g
Carbs
2.9g
Fat
3.2g
Fibre
5.1g
Sugar
42mg
Sodium
Pro Tips
- ✓
Use full-fat coconut milk for the best dough texture. Light coconut milk does not provide enough fat to keep the dough soft and pliable.
- ✓
Always work with dusted hands and a dusted surface. The dough is naturally sticky and cornstarch is your best friend throughout the shaping process.
- ✓
Do not let the shaped cakes sit uncovered for long. Cover loosely with cling film or a damp cloth until you are ready to serve.
- ✓
The red bean filling can be made up to three days ahead and stored in the fridge, saving prep time on the day.
- ✓
If your dough feels too stiff after cooking, add half a teaspoon of coconut milk and knead gently to soften it slightly before shaping.
Frequently Asked Questions
Variations
- •
Matcha Outer Dough
Whisk 1 teaspoon of ceremonial grade matcha powder into the dry glutinous rice flour before adding the coconut milk. This creates a beautiful green dough with a gentle earthy bitterness that contrasts wonderfully with the sweet red bean filling.
- •
Black Sesame Filling
Replace the red bean paste with a filling made from 4 tablespoons of black sesame paste blended with 2 tablespoons of maple syrup and 1 tablespoon of coconut cream. Roll into balls and chill as directed. The nutty, slightly bitter sesame flavour is absolutely stunning inside the coconut rice dough.
- •
Strawberry Coconut
Press a small piece of fresh strawberry into the centre of each red bean ball before wrapping in dough. The fresh fruit adds a bright, jammy note and a tiny burst of juice when you bite in. Best consumed the same day.
Substitutions
- •Full-fat coconut milk → Oat milk or almond milk (Plant-based milks with lower fat content will produce a slightly firmer, less creamy dough. Add an extra teaspoon of neutral oil such as light coconut oil to compensate.)
- •Maple syrup → Brown rice syrup or agave nectar (Both work as a 1:1 swap. Brown rice syrup has a very mild flavour and low glycaemic index. Agave is sweeter so use slightly less.)
- •Roasted soybean powder → Cornstarch or tapioca starch (These neutral starches work well for preventing sticking but do not add the toasty nutty flavour that soybean powder provides. Desiccated coconut lightly blended into a powder is a flavourful alternative.)
- •Adzuki beans → Tinned white beans or chickpeas (Blend with coconut sugar and vanilla for a paler, milder filling. The texture will be slightly different but still delicious and even higher in protein.)
🧊 Storage
Store finished rice cakes in an airtight container at room temperature for up to 6 hours. For longer storage, place in an airtight container in the fridge for up to 2 days. Before eating refrigerated cakes, microwave each one for 10 to 12 seconds to restore the soft, chewy texture. Do not freeze as freezing significantly alters the texture of the rice dough.
📅 Make Ahead
The red bean filling can be prepared up to 3 days in advance and stored in a sealed container in the fridge. Pre-roll the filling into balls and keep them chilled until you are ready to make the dough. The dough itself should be made and shaped on the day of serving for the best texture.
More Korean Desserts Recipes
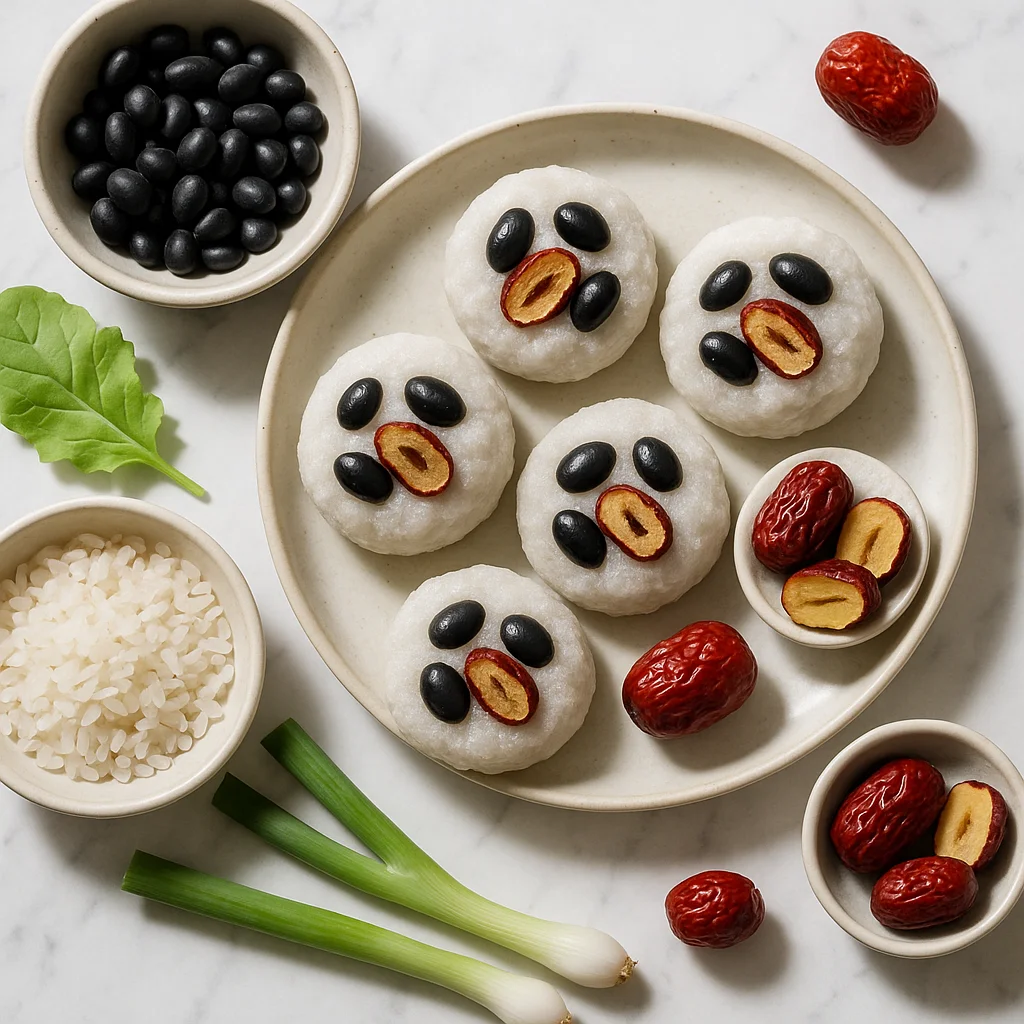
Low Sugar Chapssal-Tteok Rice Cake Recipe with Black Bean and Jujube
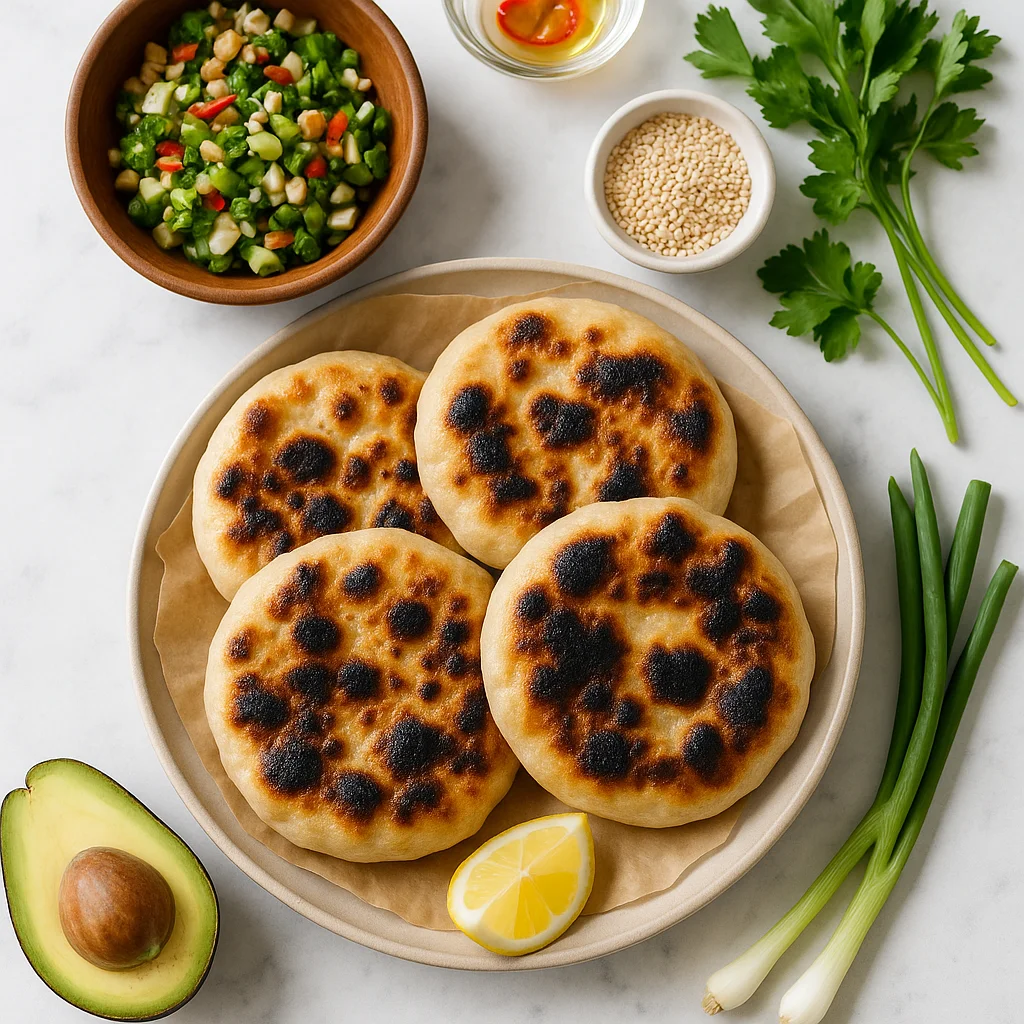
Bubble Hotteok Flame Baked Street Food Recipe (Healthy Oven Version)

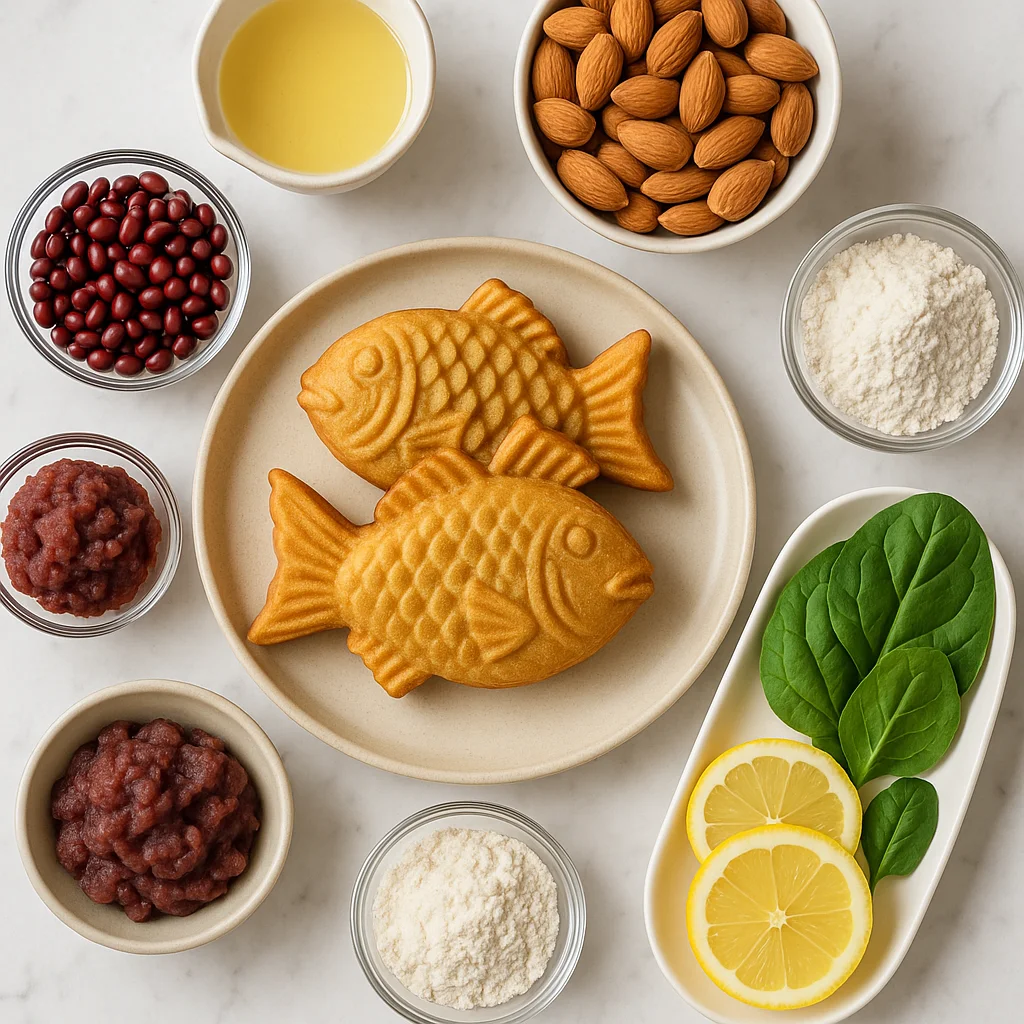
Bungeo-ppang Homemade Fish Pancake Without Deep Frying (Healthy Whole Grain Version)