Healthy Taiyaki Fish Shaped Pancake Recipe with Red Bean and Oat Flour
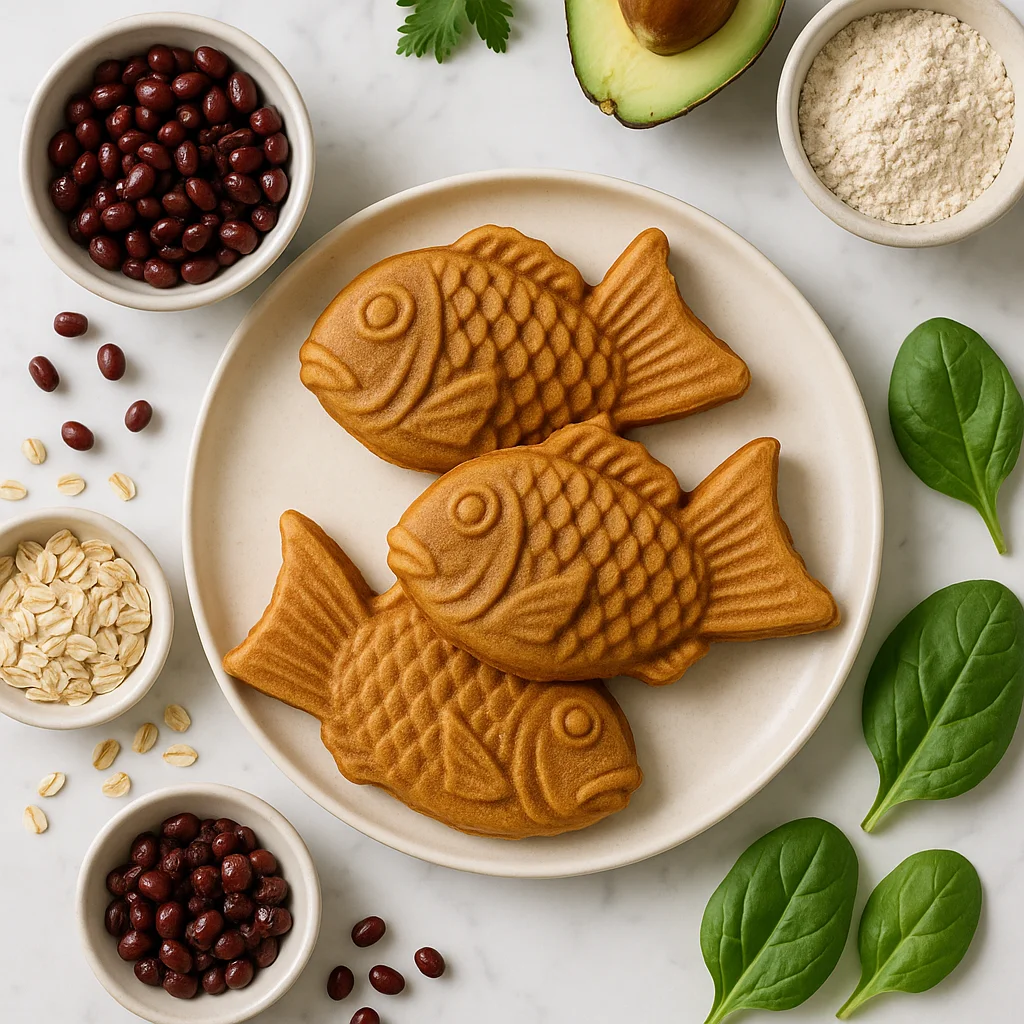
The mould matters more than you might expect in taiyaki. The distinctive fish shape, modelled on the sea bream which is considered a symbol of good luck in Japan, is not just a visual quirk. The cast iron mould creates a characteristic crust on the outside of the pancake while the interior stays soft, and the narrow tail section cooks faster than the body, creating a textural gradient from crisp at the extremities to soft and yielding in the centre where the filling is concentrated. This version uses oat flour in the batter, which adds a subtle nuttiness and more fibre than plain flour, and a lower-sugar red bean filling that allows the earthy flavour of the azuki beans to come through more clearly.
Why this recipe works
Oat flour produces a batter that is slightly denser and more substantial than a plain flour batter, creating a chewier pancake shell that holds the filling without going soggy. The batter includes a small amount of baking powder to keep it light despite the oat flour weight. A thin coating of sesame oil on the mould rather than standard cooking oil adds a subtle toasty note to the crust that complements the red bean filling. The filling itself is simple: cooked azuki beans mashed with a small amount of maple syrup, producing a paste that is firm enough to hold its shape inside the pancake.
Getting it right
Preheat the mould properly before adding any batter. An inadequately heated mould produces pale, doughy taiyaki that take too long to cook and develop uneven crust. The mould should be hot enough that a drop of batter sizzles on contact.
Add a small amount of batter to the mould first, then add the filling in the centre, then cover with more batter before closing the mould. This ensures the filling is properly enclosed and the batter sets around it evenly.
Common mistakes
Overfilling causes the batter to overflow when the mould is closed, producing a mess and taiyaki with broken sides. Use less filling than you think you need the first time, then adjust for subsequent batches.
Rushing the cooking time produces pale, soft taiyaki that do not hold together when removed from the mould. Each taiyaki needs at least two to three minutes per side on a medium-low heat.
Substitutions
Custard, made with egg yolk, sugar and cornflour, is a classic alternative filling to red bean. Sweet potato paste works beautifully. Chocolate and banana is a popular contemporary variation that appeals to children particularly.
Serving suggestion
Serve warm, tail first as tradition dictates in Japan. Eat within thirty minutes of cooking for the crispest exterior. Excellent alongside a cup of matcha or hojicha tea.
Ingredients
- 120 g oat flour (certified gluten-free if needed)
- 40 g wholegrain spelt flour (or use extra oat flour for fully gluten-free version)
- 1.5 tsp baking powder
- 0.3 tsp fine sea salt
- 2 tbsp coconut sugar
- 1 large egg (at room temperature)
- 180 ml unsweetened oat milk (or any plant milk)
- 1 tbsp light coconut oil (melted and slightly cooled, plus extra for brushing the mould)
- 1 tsp vanilla extract
- 200 g dried adzuki beans (soaked overnight and cooked until very soft, or use tinned for speed)
- 2 tbsp maple syrup (adjust to taste)
- 0.3 tsp vanilla extract (for the filling)
Instructions
- 1
If making the red bean filling from scratch, drain and rinse your soaked adzuki beans. Add them to a saucepan, cover with fresh water, and simmer over medium heat for 45 to 55 minutes until very soft. Drain well, reserving a splash of the cooking liquid.
Tinned adzuki beans work well here and cut the total time significantly. Just drain and rinse them thoroughly before using.
- 2
Transfer the cooked beans to a bowl and mash them thoroughly with a fork or potato masher. You are aiming for a thick, mostly smooth paste with just a little texture. Stir in the maple syrup and vanilla extract. If the paste feels too stiff, add a teaspoon of the reserved cooking water to loosen it slightly. Set aside to cool completely.
The filling needs to be thick enough to scoop cleanly. If it feels too wet, cook it in a small saucepan over low heat for a few minutes, stirring constantly, until it firms up.
- 3
Make the batter by combining the oat flour, spelt flour, baking powder, salt, and coconut sugar in a large mixing bowl. Whisk everything together so the leavening is evenly distributed.
- 4
In a separate jug, whisk together the egg, oat milk, melted coconut oil, and vanilla extract. Pour the wet ingredients into the dry ingredients and stir gently until a smooth batter forms. Do not overmix. A few small lumps are absolutely fine. Let the batter rest for five minutes while you heat the mould.
Resting the batter allows the oat flour to hydrate fully, which gives a softer, more cohesive texture in the finished taiyaki.
- 5
Place your taiyaki mould pan over medium-low heat on the stovetop. Brush both sides of the mould generously with melted coconut oil using a pastry brush. Allow the pan to heat for about two minutes until a drop of batter sizzles immediately on contact.
Medium-low heat is key here. Too high and the outside browns before the batter inside is cooked through.
- 6
Pour batter into each fish mould cavity until it is about two thirds full. Add a heaped tablespoon of the red bean filling directly into the centre of the batter in each mould. Spoon a little more batter on top of the filling to cover it completely and seal it in.
Do not overfill the moulds or the taiyaki will not close cleanly and filling will leak out.
- 7
Close the mould firmly and cook over medium-low heat for three to four minutes on the first side. Carefully flip the mould and cook for a further two to three minutes on the second side, until both sides are a deep golden brown and the batter feels set when you gently press the outside of the mould.
Open the mould carefully to check colour before removing. The taiyaki should release cleanly from a well-oiled mould.
- 8
Remove the taiyaki from the mould and place them on a wire rack for a minute before serving. This stops the steam from making the outside soggy. Repeat the process with any remaining batter and filling, re-oiling the mould between each batch.
Nutrition per serving
145kcal
Calories
6g
Protein
22g
Carbs
4g
Fat
4g
Fibre
6g
Sugar
115mg
Sodium
Pro Tips
- ✓
Use a pastry brush to oil every corner of the fish mould, especially the fins and tail, to prevent sticking.
- ✓
Oat flour absorbs liquid more slowly than plain flour, so resting the batter is not optional here — it genuinely improves the result.
- ✓
Keep finished taiyaki warm in a low oven at 100 degrees Celsius while you cook subsequent batches.
- ✓
For cleaner portions of filling, chill the red bean paste in the fridge for 30 minutes before use so it scoops neatly.
- ✓
A stovetop taiyaki pan gives the most authentic result, but an electric taiyaki maker works well if you have one.
Frequently Asked Questions
Variations
- •
Matcha Custard Taiyaki
Add one teaspoon of ceremonial grade matcha powder to the batter for a beautiful green colour and earthy flavour. Fill with a thick custard made from silken tofu, maple syrup and a pinch of vanilla blended until smooth.
- •
Sweet Potato and Cinnamon Taiyaki
Replace the red bean filling with roasted and mashed sweet potato mixed with half a teaspoon of cinnamon, a pinch of nutmeg and a drizzle of maple syrup. This version is especially popular with younger children.
- •
Dark Chocolate Banana Taiyaki
Use thin slices of ripe banana and a square of 85 percent dark chocolate as the filling. The banana softens and the chocolate melts during cooking, creating a rich, fudgy centre with considerably less sugar than a Nutella filling.
- •
Vegan Taiyaki
Replace the egg with one tablespoon of ground flaxseed mixed with three tablespoons of water, left to gel for five minutes before adding to the batter. Use any plant milk. The result is slightly less fluffy but still holds together well.
Substitutions
- •Oat flour → Brown rice flour (Use the same quantity. The texture will be slightly chewier and the flavour more neutral.)
- •Wholegrain spelt flour → Whole wheat flour (A direct swap works well here. Use the same weight.)
- •Coconut sugar → Light brown sugar or date sugar (Use the same quantity. Date sugar adds a little extra fibre. Light brown sugar is more widely available.)
- •Oat milk → Unsweetened almond milk or soy milk (Any unsweetened plant milk works. Soy milk adds a small protein boost.)
- •Light coconut oil → Mild olive oil or melted butter (Mild olive oil keeps this dairy-free. Butter adds a richer flavour if dairy is not a concern.)
- •Maple syrup in filling → Brown rice syrup or honey (Brown rice syrup gives a milder sweetness. Honey works well but makes the recipe no longer vegan.)
🧊 Storage
Store cooled taiyaki in an airtight container at room temperature for up to one day, or refrigerate for up to three days. To reheat, place in a dry frying pan over low heat for two minutes per side to restore the crispy exterior. They can also be frozen for up to one month. Reheat from frozen in an oven at 180 degrees Celsius for eight to ten minutes.
📅 Make Ahead
The red bean filling can be made up to four days ahead and stored in an airtight container in the fridge. The batter is best made fresh just before cooking, as the leavening loses potency if left to sit for too long.
More Japanese Desserts Recipes
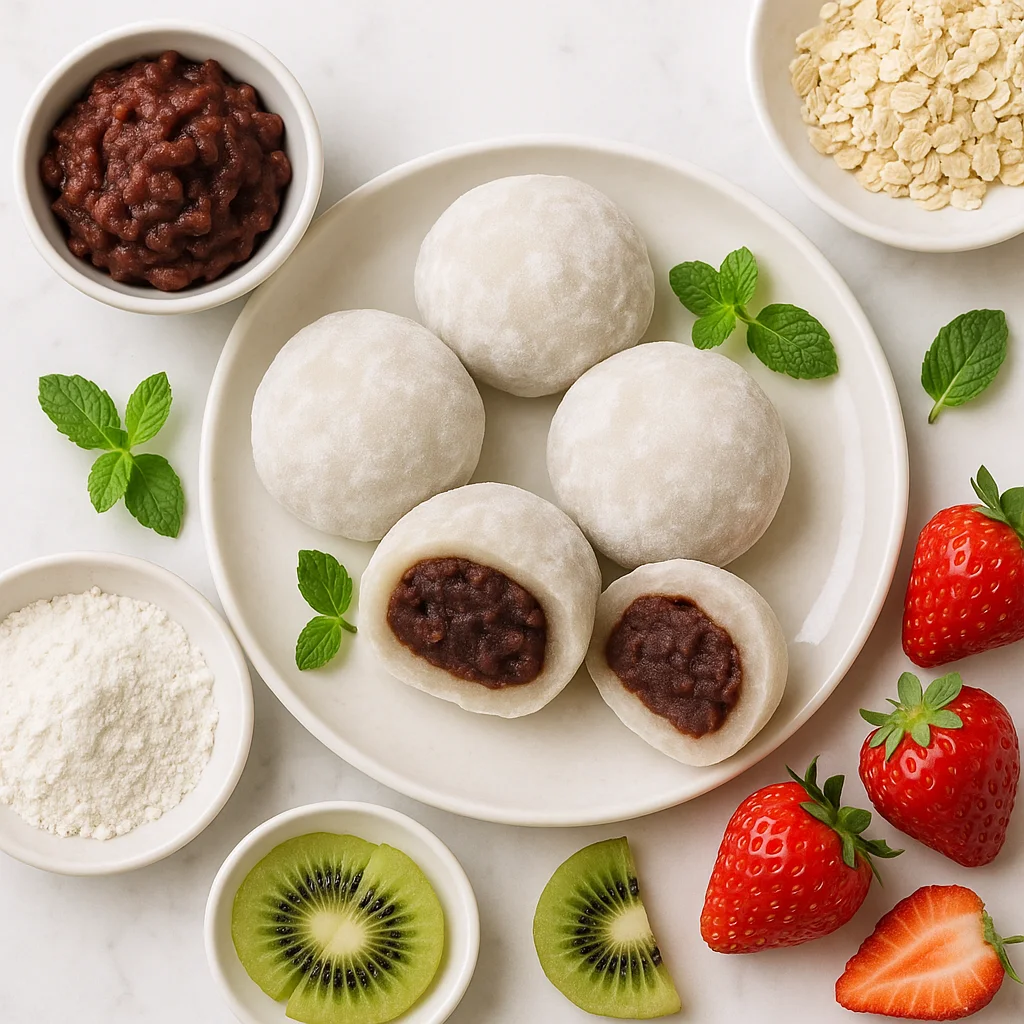
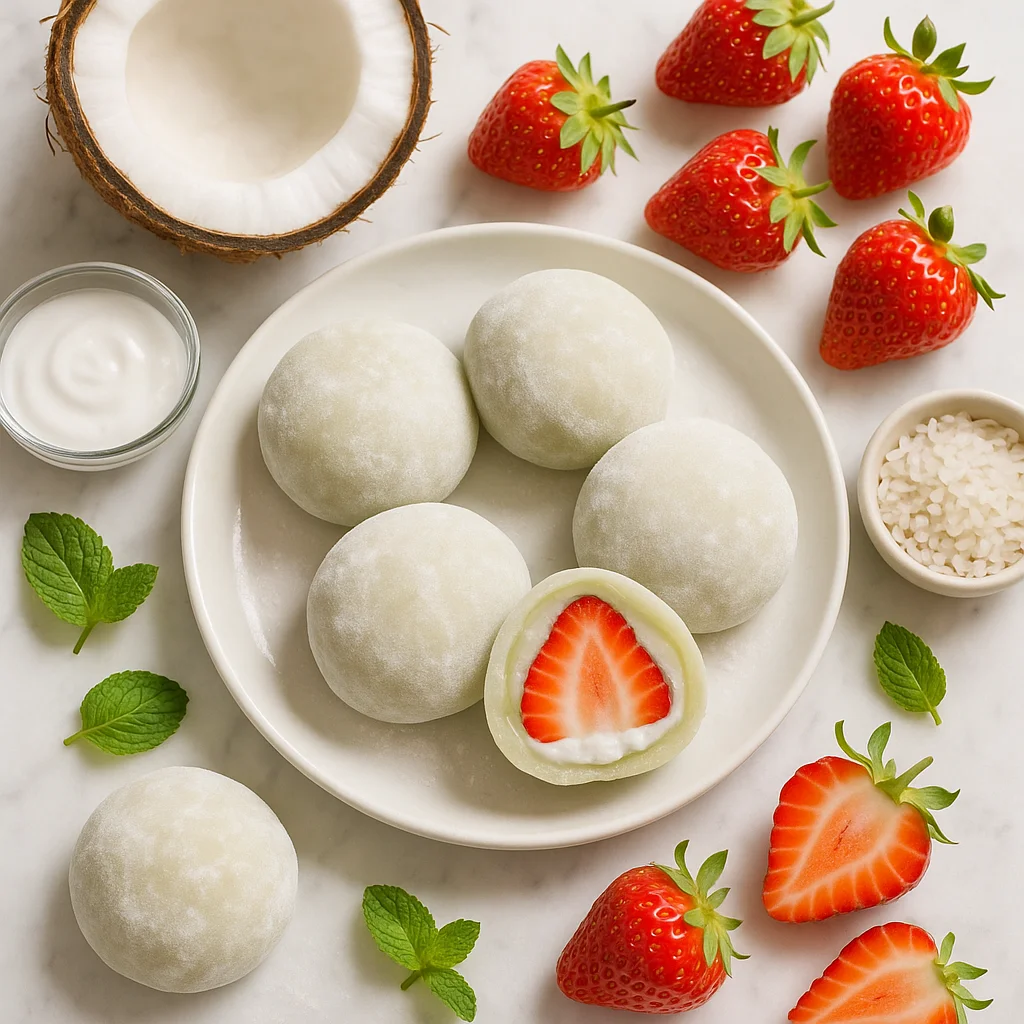
Healthy Daifuku Mochi Recipe with Red Bean Paste (Lower Sugar)
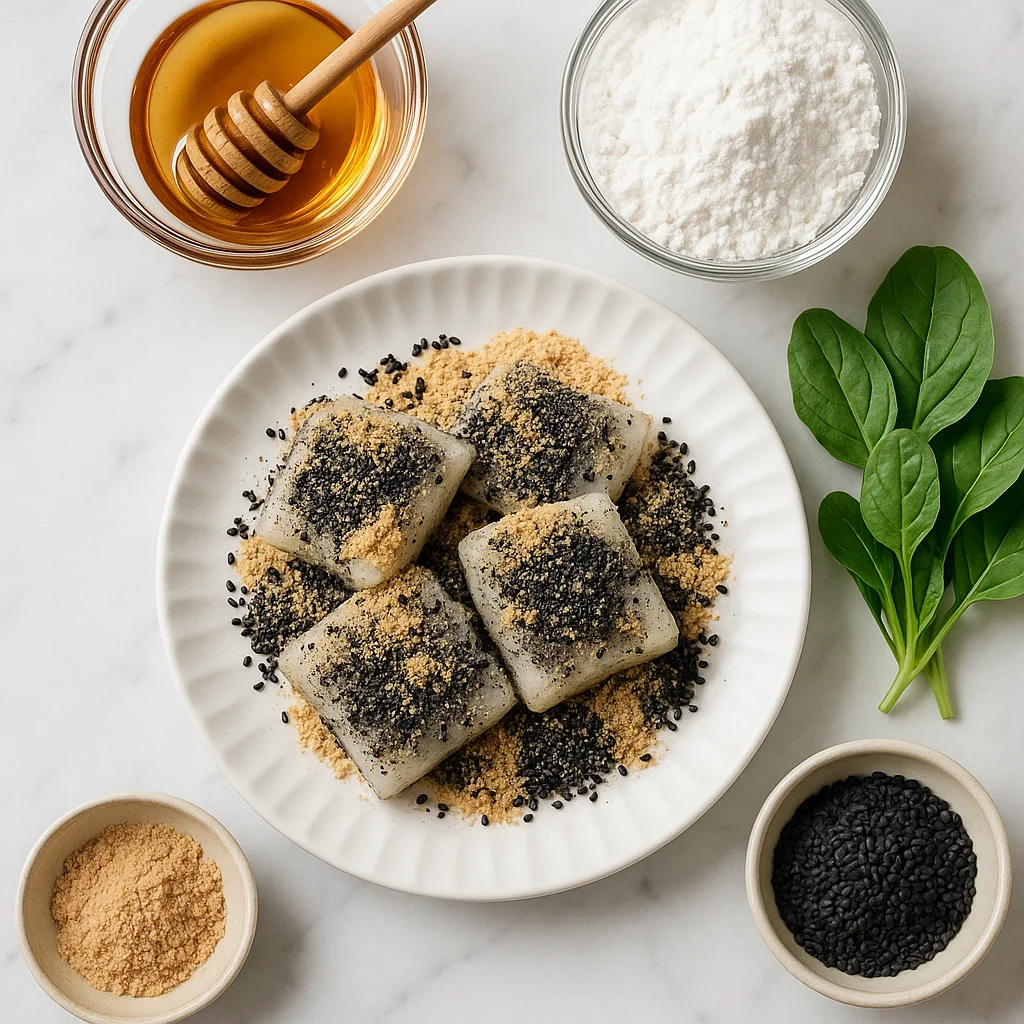
5-Minute Microwave Mochi Recipe with Honey and Black Sesame
Raindrop Cake Mizu Shingen Mochi Agar Agar Recipe with Coconut Water and Matcha Drizzle