No Bake Keto Peanut Butter Protein Bars (Low Carb, High Protein)
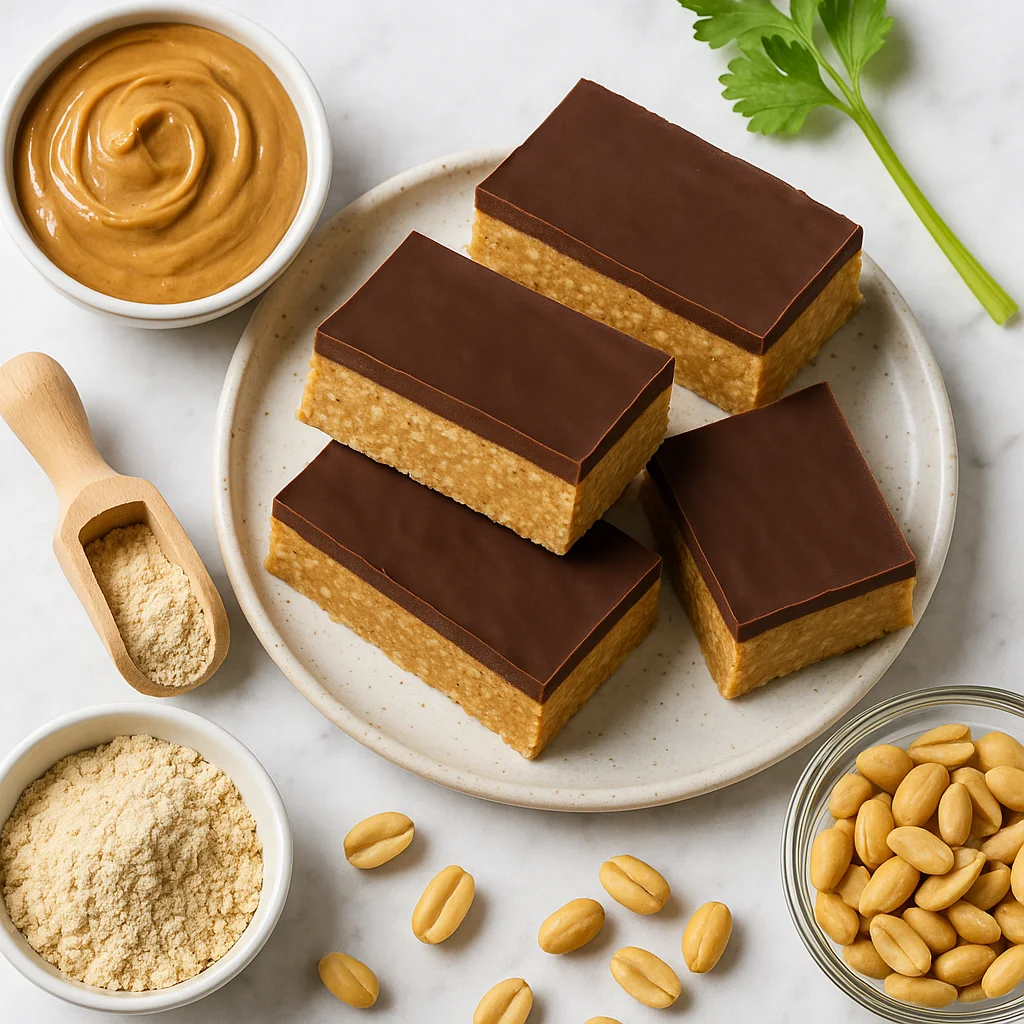
If you have been searching for a satisfying, nutrient-dense snack that keeps you full without spiking your blood sugar, these no bake keto peanut butter protein bars are exactly what you need. Made with just a handful of wholesome, low-carb ingredients, they come together in under 15 minutes and require absolutely zero oven time. Whether you are fuelling a morning workout, fighting a mid-afternoon slump, or looking for a guilt-free dessert, these bars deliver on every level.
What makes these bars stand out from the dozens of keto bar recipes floating around the internet is the intentional balance of macronutrients. Each bar delivers approximately 18 grams of protein, healthy fats from natural peanut butter and coconut oil, and a modest amount of net carbohydrates, making them genuinely suitable for a ketogenic or low-carb lifestyle. Unlike many store-bought keto bars that rely on sugar alcohols, artificial sweeteners, and a long list of unrecognisable additives, every ingredient in this recipe is one you can find at any grocery store and feel confident about putting in your body.
The secret to the fudgy, almost brownie-like texture is the combination of natural peanut butter and unflavoured or vanilla keto protein powder. We specifically chose a whey or plant-based protein powder with minimal fillers to avoid the chalky, dry texture that plagues so many homemade protein bars. The addition of almond flour keeps the bars cohesive and adds a subtle nuttiness while contributing healthy fats and fibre. A small amount of powdered erythritol or monk fruit sweetener provides just enough sweetness without any of the blood sugar impact of traditional sugar.
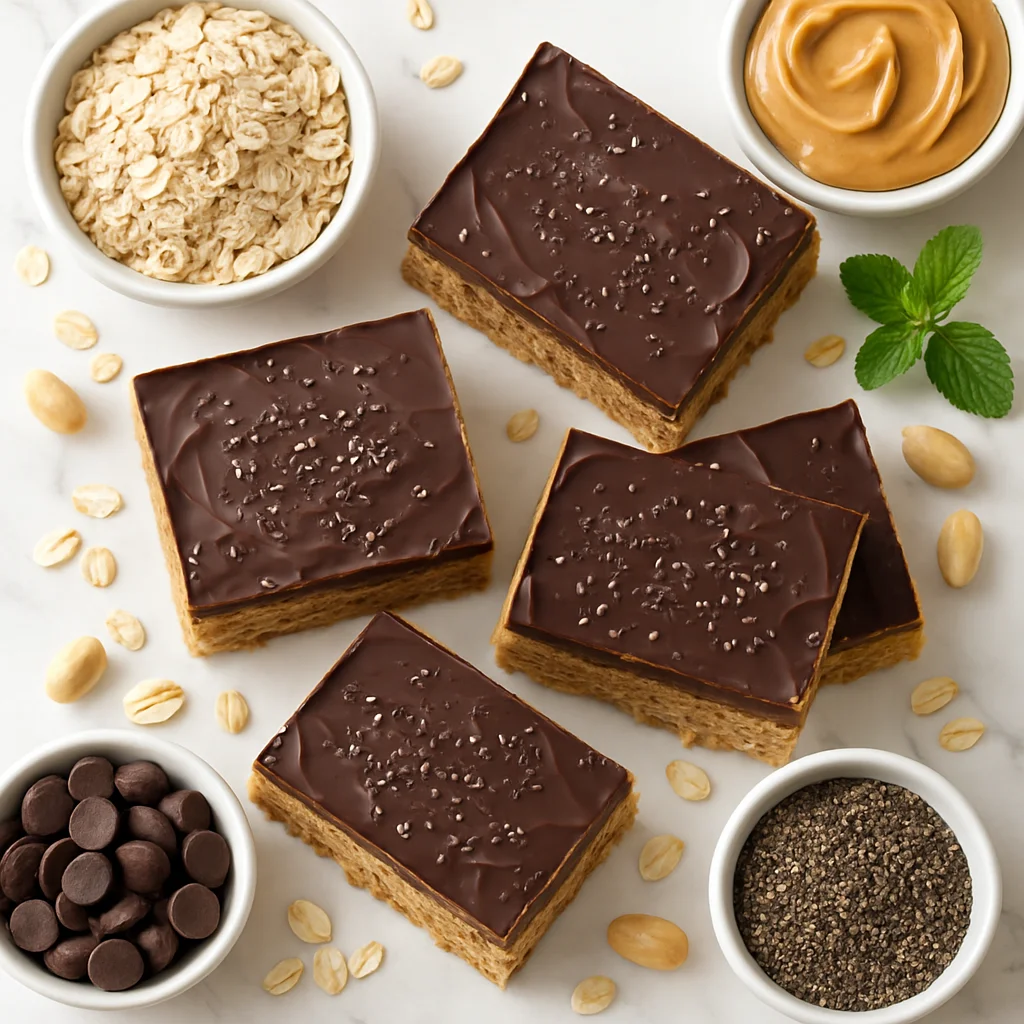
For the chocolate lovers among us, a thin dark chocolate drizzle on top, made with 85 percent or higher dark chocolate, adds an indulgent finishing touch while keeping the carbohydrate count in check. Dark chocolate at this cacao percentage is naturally lower in sugar and contains beneficial antioxidants, making it a health-conscious choice rather than a cheat. If you want a thicker chocolate layer reminiscent of a Reese's peanut butter cup, simply melt 90g of dark chocolate with the coconut oil and pour it directly over the chilled base rather than drizzling, then return to the fridge until fully set.
These bars are not only keto-friendly, they are also naturally gluten-free, refined sugar-free, and can easily be made dairy-free by choosing a plant-based protein powder and swapping the whey component. If you follow a paleo approach, a collagen-based or egg white protein powder works beautifully here and maintains the bar structure without any grains or legumes. The recipe is flexible enough to adapt to a wide range of dietary needs without sacrificing taste or texture.
Preparation is refreshingly straightforward. You simply combine the wet ingredients, natural peanut butter, coconut oil, and vanilla extract, warm them gently to make mixing easier, then stir in the dry ingredients until a thick, dough-like mixture forms. Press the mixture firmly into a lined baking tin, smooth the top, and refrigerate for at least 45 minutes until the bars are firm enough to slice cleanly. That is genuinely all there is to it.
One of the most common questions we hear is whether the protein powder brand matters. The honest answer is yes, it matters quite a lot. Whey protein isolate produces the densest, most cohesive texture and has a neutral flavour that lets the peanut butter shine. Pea protein blends work well but can leave bars slightly more crumbly, so adding an extra tablespoon of almond milk compensates. Avoid using collagen peptides as the sole protein source, as they dissolve rather than bind and will cause the bars to fall apart when sliced. If you are unsure which brand to use, a vanilla-flavoured whey isolate with fewer than five ingredients on the label is almost always a safe choice.
From a nutritional standpoint, these bars outperform most commercial options in every meaningful category. Traditional peanut butter protein bars from popular brands often contain 20 to 30 grams of sugar, refined grains, and upwards of 300 calories per bar. This homemade version keeps calories around 218 per bar, slashes sugar to under 2 grams, and delivers more fibre thanks to the almond flour and chia seeds added to the base. Fibre is critically important on a keto diet to support digestive health and help you feel fuller for longer.
Meal preppers will be particularly pleased to know that these bars store beautifully. A batch of 12 bars can be made on a Sunday and kept in the refrigerator all week, or individually wrapped and frozen for up to two months. Having a ready-to-go, macro-balanced snack on hand is one of the most effective strategies for staying consistent with any healthy eating plan, and these bars make that effortless.
Whether you are a seasoned keto dieter, a fitness enthusiast tracking your macros, or simply someone who wants a wholesome alternative to processed snack bars, this recipe belongs in your regular rotation. It is proof that eating low-carb, high-protein, and genuinely healthy does not mean sacrificing the flavours and textures you love. Rich peanut butter, a hint of vanilla, a touch of sweetness, and that satisfying dense chew, these no bake keto peanut butter protein bars truly have it all.
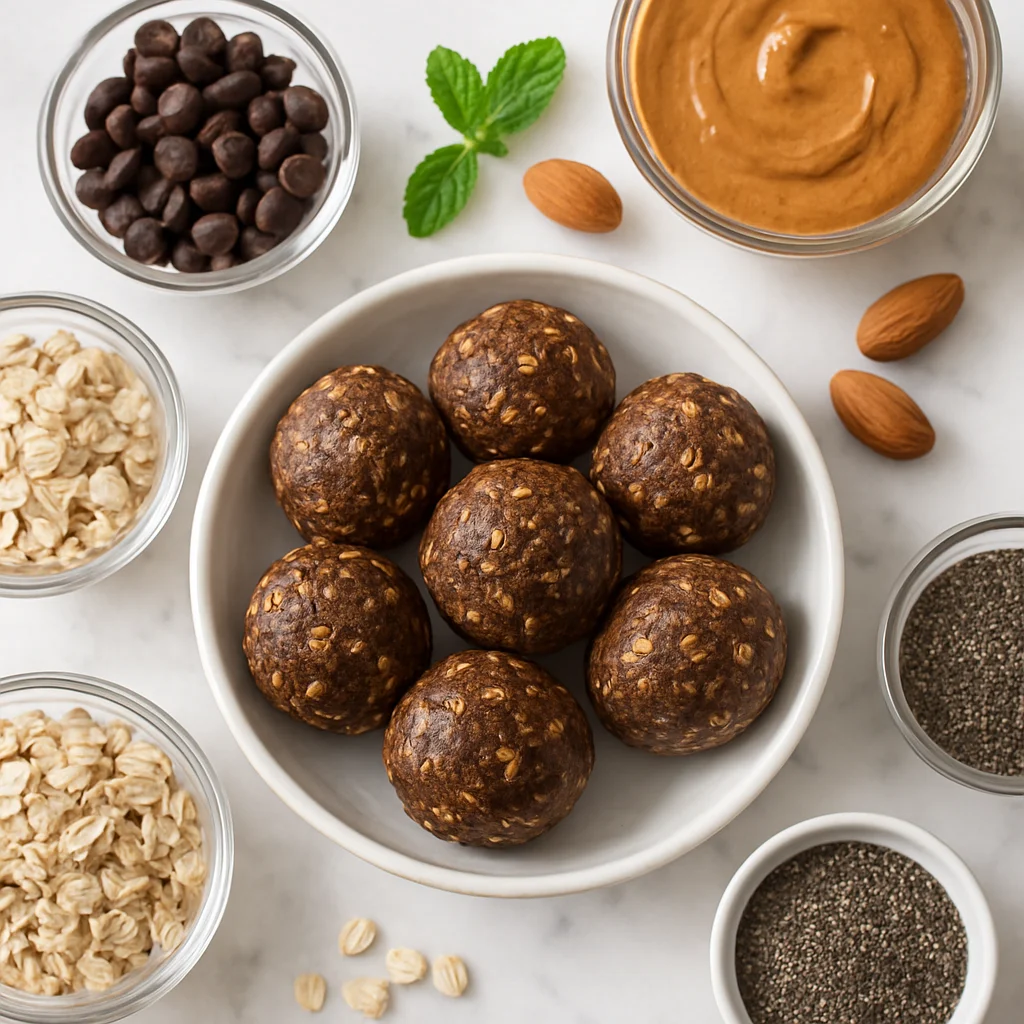
Ingredients
- 1 cup natural peanut butter (smooth, no added sugar or oil — the only ingredient should be peanuts (and optionally salt); stir well before measuring if oil has separated)
- 3 tbsp coconut oil (melted and cooled slightly; refined coconut oil has a neutral flavour, unrefined adds a subtle coconut note)
- 2 tsp pure vanilla extract (use pure extract rather than imitation for the best flavour)
- 1.5 cups vanilla or unflavoured keto protein powder (whey protein isolate gives the densest, most cohesive texture; plant-based blends work but may require an extra tablespoon of almond milk; approximately 120g — measure by weight for the most consistent results)
- 1 cup blanched almond flour (must be finely ground blanched almond flour, not almond meal or ground almonds — the finer grind produces a smoother, more cohesive bar with no gritty texture)
- 2 tbsp chia seeds (adds fibre and acts as a natural binder; white or black chia seeds both work equally well)
- 4 tbsp powdered erythritol or monk fruit sweetener (must be powdered (not granular) for smooth integration — granular erythritol can leave a gritty texture; adjust to taste starting with 3 tablespoons and adding more as needed)
- 0.3 tsp fine sea salt (enhances the peanut butter flavour and balances the sweetness; do not skip even if your peanut butter already contains salt)
- 3 tbsp unsweetened almond milk (add one tablespoon at a time until the dough holds together when pressed; the exact amount needed will vary by protein powder brand — some absorb significantly more liquid than others)
- 60 g 85% or higher dark chocolate (optional, for drizzling; choose a bar with 85% or higher cacao for the lowest sugar content — Lindt 85% or 90% works well; for a thicker Reese's-style chocolate layer, increase to 90g and pour rather than drizzle)
- 1 tsp coconut oil (optional, for thinning the chocolate drizzle — creates a glossier, smoother finish that sets firmly in the fridge)
Instructions
- 1
Line a 9x9 inch (23x23 cm) square baking tin with parchment paper, leaving some overhang on the sides to make lifting the bars out easier. Set aside.
A smaller tin such as 8x8 inch will produce thicker bars — adjust chilling time by an extra 15 to 20 minutes if using a smaller tin. An 8x8 inch tin gives bars with a satisfying thickness that is closer to a commercial protein bar.
- 2
In a large microwave-safe mixing bowl, combine the natural peanut butter and 3 tablespoons of melted coconut oil. Microwave for 20 to 30 seconds and stir well until the mixture is smooth, fluid, and easy to mix. Add the vanilla extract and stir to combine.
If your peanut butter has separated in the jar, stir it thoroughly before measuring to ensure the oil is evenly distributed. Very runny natural peanut butter at room temperature may not need microwaving at all — just stir until combined.
- 3
Add the protein powder, almond flour, chia seeds, powdered sweetener, and sea salt to the peanut butter mixture. Stir vigorously with a silicone spatula or wooden spoon until all the dry ingredients are fully incorporated and no dry pockets remain.
The mixture will be very thick and stiff at this stage — that is exactly right. If it looks impossibly dry before you add the almond milk, do not panic; it will come together once liquid is added. Make sure to scrape the bottom of the bowl where dry pockets tend to hide.
- 4
Add the almond milk one tablespoon at a time, stirring after each addition, until the mixture reaches a thick, pliable dough-like consistency that holds together when pressed between your fingers. You may need slightly more or less liquid depending on your protein powder brand.
The finished dough should feel like stiff, firm cookie dough — not wet batter and not so dry it crumbles. Test it by squeezing a small amount in your palm: if it holds together without falling apart, it is ready. If it crumbles, add another half tablespoon of almond milk.
- 5
Transfer the mixture into the prepared baking tin. Use the back of a spoon, a spatula, or the flat base of a measuring cup to press it down firmly and evenly into all corners. The more firmly you press, the better the bars will hold together when sliced.
Place a sheet of parchment paper on top of the mixture and use the palm of your hand or a flat-bottomed glass to press firmly and evenly — this gives you much better pressure than a spatula alone and creates a perfectly smooth, level surface.
- 6
Place the tin in the refrigerator and chill for a minimum of 45 minutes, or until the bars are completely firm to the touch. For best results, chill for 1 to 2 hours.
Short on time? Place the tin in the freezer for 20 to 25 minutes until firm, then transfer to the refrigerator for storage. Do not attempt to slice the bars until they are completely firm — a partially set bar will compress and tear rather than cut cleanly.
- 7
If adding the optional chocolate drizzle, melt the dark chocolate and 1 teaspoon of coconut oil together in a small bowl over a pan of barely simmering water or in the microwave in 20-second bursts, stirring between each burst until fully melted and smooth.
Do not let water come into contact with the melting chocolate — even a single drop can cause it to seize and become grainy and unusable. Make sure your bowl and utensils are completely dry before starting. If the chocolate does seize, adding another teaspoon of coconut oil and stirring vigorously can sometimes rescue it.
- 8
Once the bars are fully chilled and firm, lift them out of the tin using the parchment overhang. Drizzle the melted chocolate over the surface in a back-and-forth motion using a spoon or piping bag. Return to the refrigerator for 10 minutes to allow the chocolate to set.
For a thicker, more indulgent Reese's-style chocolate topping, pour the melted chocolate directly over the slab and tilt to spread evenly, then tap the base firmly on the counter a few times to level the surface before refrigerating.
- 9
Using a sharp knife, cut the slab into 12 equal bars. For the cleanest cuts, run the knife blade under hot water, wipe it dry, and cut in one firm downward motion rather than sawing.
Score the top surface lightly with a ruler to mark out even portions before making full cuts. A warm, dry blade slices through the chocolate drizzle without shattering it. Wipe the blade clean between cuts for the neatest edges.
- 10
Serve immediately or store as directed below. Enjoy straight from the fridge for the firmest texture, or allow to sit at room temperature for 5 minutes for a slightly softer, fudgier bite.
If gifting or meal prepping, wrap individual bars in small squares of parchment paper and secure with a piece of tape or twine. This prevents sticking and makes them easy to grab from the fridge without unwrapping an entire container.
Nutrition per serving
218kcal
Calories
18g
Protein
9g
Carbs
14g
Fat
4g
Fibre
2g
Sugar
142mg
Sodium
Pro Tips
- ✓
Always use natural peanut butter with peanuts (and possibly salt) as the only ingredients, commercial brands with added sugar, palm oil, or hydrogenated oils will significantly increase the carb count and alter the texture of the bars.
- ✓
The protein powder brand you choose dramatically affects the final texture. Whey protein isolate produces the densest, most cohesive bars. Plant-based blends (pea, rice, or hemp) work well but can make bars slightly more crumbly, if using plant-based protein, add an extra tablespoon of almond milk to compensate.
- ✓
Taste the raw dough before pressing it into the tin and adjust sweetness to your preference by adding more powdered sweetener one teaspoon at a time. The sweetness perception drops slightly once chilled, so err on the slightly sweeter side if you are unsure.
- ✓
If the mixture feels too dry or crumbly and will not press together, add unsweetened almond milk half a tablespoon at a time, mixing thoroughly between additions, until the dough holds its shape when squeezed. This is almost always caused by a protein powder that absorbs more liquid than expected.
- ✓
For the cleanest, most professional-looking cuts, score the surface of the chilled slab lightly with a ruler and knife to mark out 12 equal portions before making full cuts. Run your knife blade under hot water, wipe it dry, and cut with one firm downward motion rather than sawing back and forth.
- ✓
These bars are best enjoyed cold, directly from the refrigerator, as the coconut oil in the base softens noticeably at room temperature. If you prefer a slightly softer, fudgier bite, remove from the fridge 5 minutes before eating, but do not leave them out for longer than 30 minutes in a warm kitchen.
- ✓
For an extra nutritional boost, stir one tablespoon of ground flaxseed into the dry ingredients. It adds omega-3 fatty acids and additional soluble fibre without altering the flavour, and helps bind the mixture slightly more firmly.
Frequently Asked Questions
Variations
- •
Chocolate Peanut Butter Fudge Bars
Add 3 tablespoons of unsweetened cocoa powder to the dry ingredients for a rich chocolate-peanut butter flavour profile. Increase almond milk by one tablespoon to compensate for the extra dry ingredient. Top with the dark chocolate drizzle for a double chocolate effect.
- •
Peanut Butter Crunch Bars
Fold in 3 tablespoons of roughly crushed roasted peanuts and 2 tablespoons of unsweetened coconut flakes into the dough before pressing into the tin. This adds textural contrast and an extra hit of healthy fats and fibre.
- •
Peanut Butter and Jam Layered Bars
Press half the mixture into the tin, spread a thin layer of no-sugar-added raspberry or strawberry jam (approximately 3 tablespoons) over the top, then press the remaining mixture over the jam layer. The fruity middle layer adds a classic peanut butter and jelly flavour while adding minimal sugar.
- •
Collagen Protein Bars (Paleo Option)
Replace the whey or plant-based protein powder with an equal amount of unflavoured collagen peptides and reduce almond milk by one tablespoon as collagen does not absorb liquid in the same way. This version is suitable for paleo diets and is particularly beneficial for joint and skin health.
Substitutions
- •Natural peanut butter → Almond butter or sunflower seed butter (Almond butter keeps the recipe keto and nut-based. Sunflower seed butter makes it nut-free but may give a slightly earthy flavour, add a pinch of extra salt to balance.)
- •Almond flour → Sunflower seed flour or oat flour (Sunflower seed flour maintains a nut-free and keto-friendly profile. Oat flour adds more carbohydrates and is not strictly keto but works for a general low-carb approach.)
- •Erythritol or monk fruit sweetener → Allulose, xylitol, or stevia powder (Allulose produces a slightly softer bar. Xylitol is toxic to dogs so be cautious if you have pets. Stevia is much more potent, use only one teaspoon in place of 4 tablespoons of erythritol and adjust to taste.)
- •Coconut oil → Grass-fed butter or ghee (Both add a rich, buttery flavour and are suitable for keto. Note that butter and ghee are not dairy-free, so stick with coconut oil if you need a dairy-free version.)
- •Unsweetened almond milk → Unsweetened coconut milk or water (Coconut milk (from a carton, not a can) adds a very subtle coconut flavour that pairs well with the peanut butter. Water works perfectly well and does not affect the flavour.)
- •Dark chocolate for drizzle → Lily's sugar-free chocolate chips or a cocoa powder glaze (Lily's chocolate chips are sweetened with stevia and erythritol, making them ideal for strict keto. A cocoa powder glaze made with cocoa powder, coconut oil, and a tiny amount of powdered sweetener is another zero-sugar option.)
🧊 Storage
Store bars in an airtight container in the refrigerator for up to 7 days. Place sheets of parchment between layers to prevent sticking. For longer storage, wrap individual bars tightly in cling film or parchment paper, place in a zip-lock freezer bag, and freeze for up to 2 months. Thaw frozen bars in the refrigerator overnight or at room temperature for 20 to 30 minutes before eating.
📅 Make Ahead
These bars are ideal for meal prep. The full batch can be made up to 5 days in advance and stored in the refrigerator. Alternatively, double the batch and freeze half for later in the month. The bars do not need to be thawed before eating if you prefer a firmer, almost frozen-treat texture.
More No-Bake Desserts Recipes
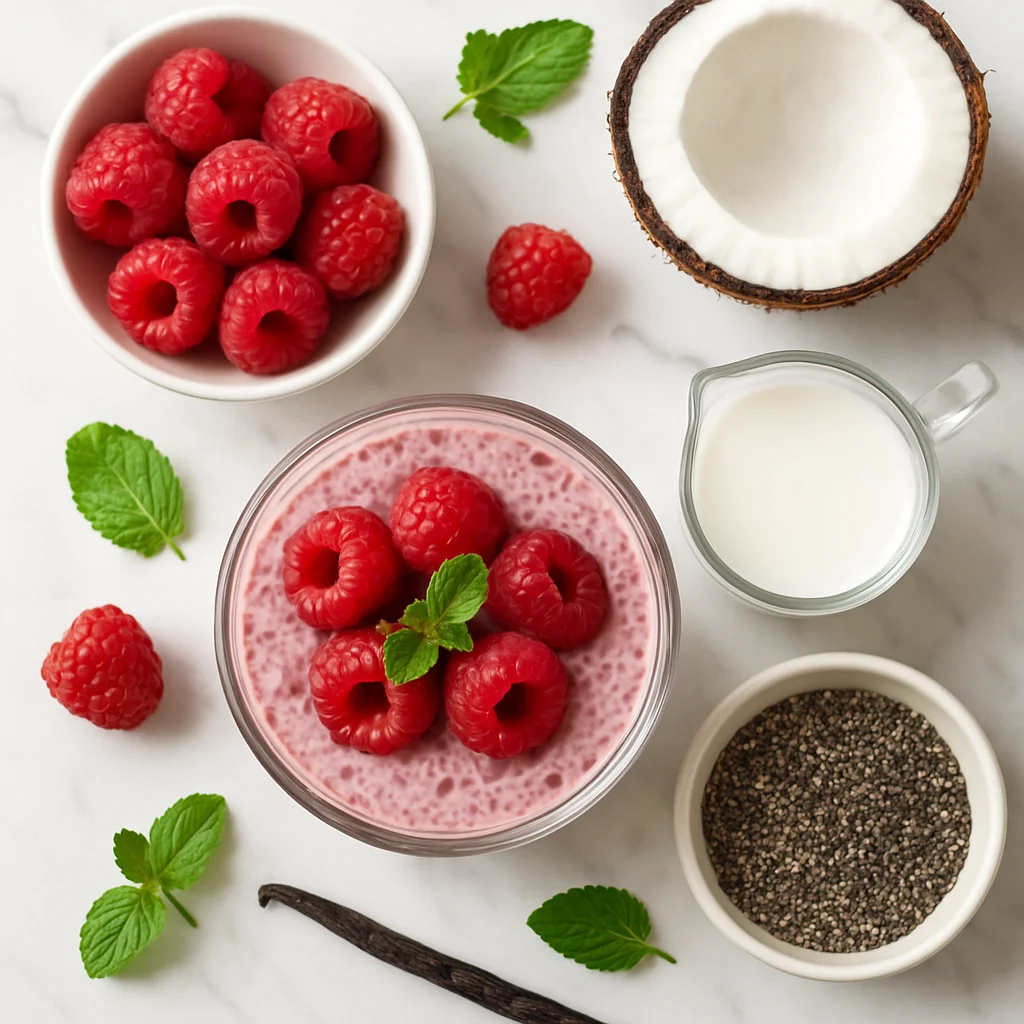
No Bake Raspberry Chia Seed Pudding with Vanilla and Coconut Milk
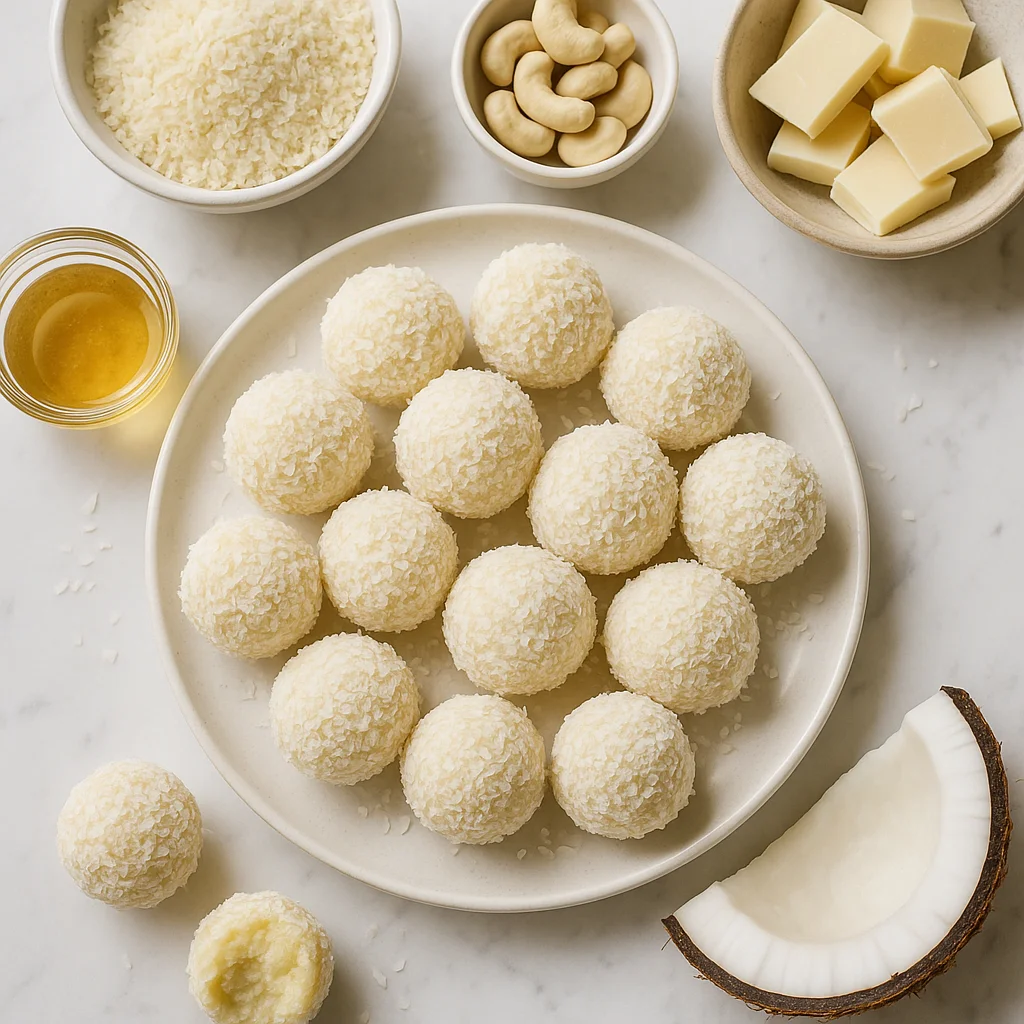
No Bake White Chocolate Coconut Truffles (Healthy & Refined Sugar-Free)
No Bake Chocolate Oat Energy Balls with Chia and Almond Butter