Keto No Bake Oreo Cheesecake (Healthy & Low Carb)
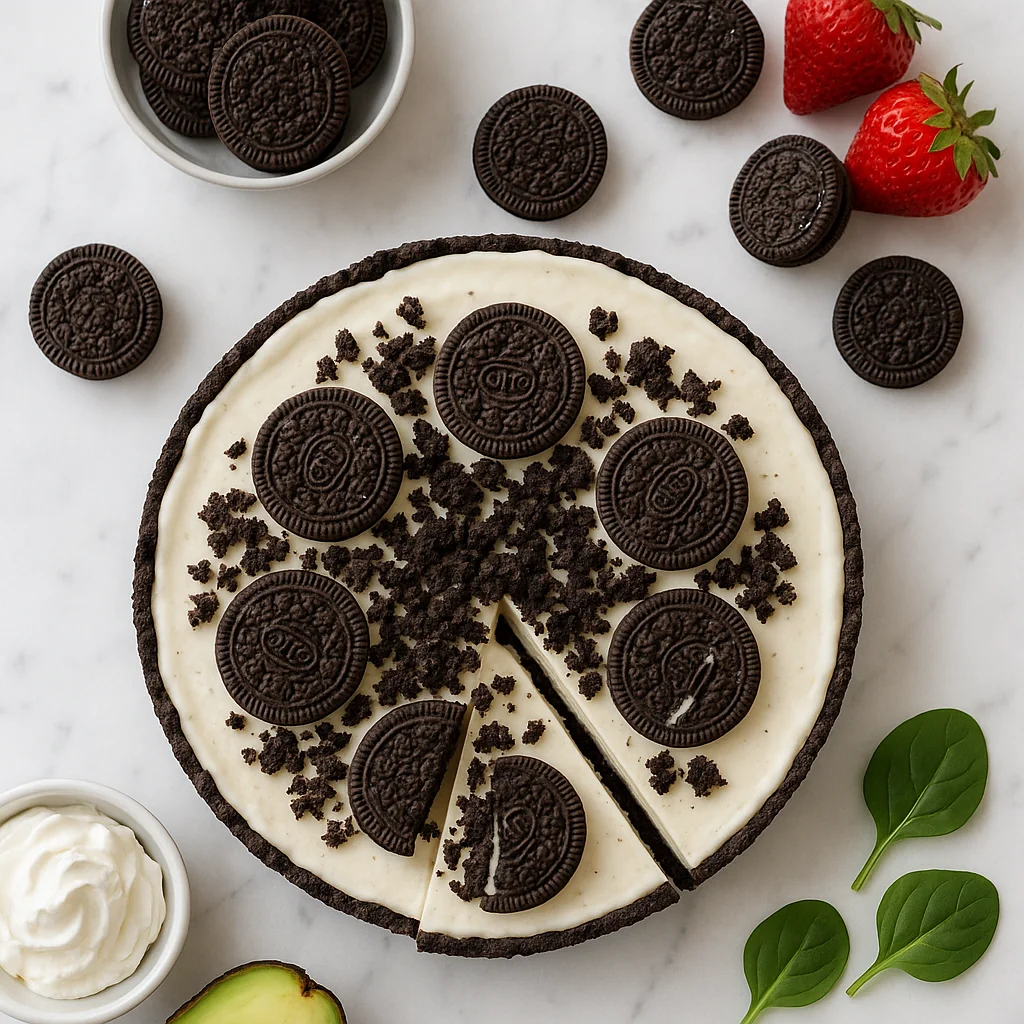
If you have been searching for a keto no bake Oreo cheesecake that genuinely tastes indulgent without derailing your low-carb lifestyle, you have landed in exactly the right place. This recipe was built from the ground up to deliver every bit of that classic cookies-and-cream cheesecake experience, the chocolatey crunch of the crust, the dense and velvety cream cheese filling, and the signature dark specks throughout, while keeping net carbs low, sugar completely out of the picture, and overall calories well below a traditional version. Whether you are following a strict ketogenic diet, simply trying to reduce refined sugar, or just want a healthier dessert option that does not compromise on taste, this cheesecake will become a permanent fixture in your recipe rotation.
What makes a traditional Oreo cheesecake so problematic for anyone watching their health? The original sandwich cookies are loaded with refined flour, refined sugar, and hydrogenated oils. A standard slice of Oreo cheesecake from a bakery or restaurant can clock in at over 500 calories per serving with 60 or more grams of carbohydrates. That is before you even consider the whipped topping or the chocolate drizzle. Our version flips the script entirely.
Instead of Oreo cookies in the crust, we use a combination of blanched almond flour and unsweetened cocoa powder mixed with a touch of coconut oil and powdered erythritol. The result is a deeply chocolatey, slightly crisp base that holds together beautifully and contains a fraction of the carbohydrates found in a traditional cookie crust. Dutch-process cocoa is particularly recommended here, its darker colour and smoother flavour profile mimic the look and taste of an Oreo crust more convincingly than natural cocoa powder.
For that signature Oreo flavour running through the filling, we rely on keto-friendly chocolate sandwich cookies, widely available at health food stores and online, which are made with almond flour or coconut flour and sweetened with erythritol or monk fruit. Popular brands include Catalina Crunch, NuTrail, and HighKey. When crushed into the cream cheese filling, they create that unmistakable cookies-and-cream effect without a single gram of refined sugar. Leaving the cookie pieces on the larger side when folding them in is key, you want visible dark chunks throughout the filling, not a uniform grey mixture.
The filling itself is where this cheesecake truly shines. We use full-fat cream cheese as the base, which provides richness and a satisfying mouthfeel while keeping the macros firmly in keto territory. Cream cheese is naturally low in carbohydrates and high in fat, making it the ideal foundation for a ketogenic dessert. We whip it together with powdered erythritol, pure vanilla extract, and cold heavy whipping cream to achieve a light yet dense texture that sets up perfectly in the refrigerator without the need for any gelatine or baking. The single most important preparation step is making sure your cream cheese is fully softened to room temperature before mixing, cold cream cheese will leave lumps that simply will not beat out, no matter how long you mix.
The entire dessert comes together in about 25 minutes of active preparation time, with a chill period in the refrigerator doing all the heavy lifting to set the filling to that classic sliceable consistency. This is a true no-bake recipe, no oven required, which makes it perfect for warm weather months, holiday entertaining, or anyone who simply does not want to turn on the oven for dessert. One popular variation worth trying: freeze the finished cheesecake for two hours before serving to transform it into a stunning cookies-and-cream ice cream cake.
From a nutritional standpoint, each slice of this keto no bake Oreo cheesecake contains approximately 278 calories, only 5 grams of net carbs, and 26 grams of healthy fat that will keep you satiated for hours. Compare that to a standard cheesecake slice, and the difference is remarkable. We have also managed to push the fibre content higher than you might expect thanks to the almond flour crust, which contributes both texture and digestive benefits.
Erythritol, the sweetener used throughout this recipe, is a sugar alcohol that is well tolerated by most people, does not spike blood glucose levels, and has a clean sweet flavour with no unpleasant aftertaste. If you prefer monk fruit sweetener or a blended erythritol-monk fruit product, both work equally well here. This cheesecake is naturally gluten-free, grain-free, and refined-sugar-free, making it suitable not just for keto dieters but also for those following a gluten-free or low-glycaemic lifestyle.
Make it for a dinner party, a weekend treat, or meal prep it at the start of the week for a grab-and-go dessert that satisfies cravings without guilt. Topped with a dollop of lightly sweetened whipped cream and a few crushed keto chocolate cookies for garnish, it looks every bit as impressive as a bakery creation. Let us walk you through exactly how to make it.
Ingredients
- 1.5 cups blanched almond flour (finely ground for smoothest crust texture; super-fine brands like Bob's Red Mill or Anthony's work best)
- 3 tbsp unsweetened cocoa powder (Dutch-process strongly preferred — deeper colour, smoother flavour, and a more convincing Oreo-crust appearance)
- 3 tbsp powdered erythritol (for the crust; sift before using to prevent grittiness)
- 0.3 tsp fine sea salt (enhances the chocolate flavour; do not skip)
- 4 tbsp coconut oil (melted and cooled to room temperature; or unsalted butter for a richer flavour)
- 1 tsp pure vanilla extract (for the crust; use pure, not imitation, for best flavour)
- 480 g full-fat cream cheese (softened to room temperature for at least 1 hour — two 240g blocks; block-style, not spreadable tub)
- 0.8 cup powdered erythritol (for the filling; sift through a fine mesh sieve to guarantee a silky, lump-free texture)
- 1 tsp pure vanilla extract (for the filling; adds depth and rounds out the sweetness)
- 1 cup heavy whipping cream (must be cold straight from the fridge — warm cream will not whip to stiff peaks; use 35%+ fat content)
- 8 pieces keto chocolate sandwich cookies (almond-flour based, erythritol-sweetened; roughly crushed into uneven chunks — Catalina Crunch, HighKey, or NuTrail all work well)
- 2 tbsp unsweetened cocoa powder (stirred into filling for cookies-and-cream colour effect and extra chocolate depth)
- 4 pieces keto chocolate sandwich cookies (for topping and garnish; crush more finely than the filling cookies for an attractive finish)
Instructions
- 1
Lightly grease a 9-inch springform pan with coconut oil and line the base with a circle of parchment paper. Set aside.
A springform pan is essential here — it allows you to remove the cheesecake cleanly without disturbing the crust. Line the base with parchment cut to fit exactly inside the ring for effortless serving.
- 2
In a medium bowl, whisk together the almond flour, 3 tablespoons cocoa powder, 3 tablespoons powdered erythritol, and sea salt until fully combined and no lumps remain.
Whisking the dry ingredients together first ensures the cocoa and erythritol are fully distributed, which means a uniform colour and flavour throughout the crust.
- 3
Add the melted coconut oil and 1 teaspoon vanilla extract to the dry crust ingredients. Mix with a fork until the mixture resembles damp sand and holds together when pressed between your fingers.
If the mixture seems too dry or crumbly, add coconut oil half a teaspoon at a time until it just holds together when pressed. Humidity and almond flour brands vary, so small adjustments are normal.
- 4
Transfer the crust mixture into the prepared springform pan. Use the flat bottom of a measuring cup or a glass to press the mixture firmly and evenly across the base and about 1 cm up the sides. Place in the freezer for 15 minutes to firm up.
A firmly packed crust prevents crumbling when you slice the finished cheesecake. The flat base of a straight-sided measuring cup or a smooth-bottomed glass gives the cleanest, most even press.
- 5
While the crust chills, prepare the filling. In a large bowl, beat the softened cream cheese with a hand mixer or stand mixer on medium speed for 2 minutes until completely smooth and fluffy with no lumps.
Room-temperature cream cheese is non-negotiable — cold cream cheese will leave lumps that do not whip out no matter how long you beat. If you forgot to soften it, cut the blocks into small cubes and microwave in 10-second bursts until just pliable.
- 6
Add the 0.75 cup powdered erythritol, 1 teaspoon vanilla extract, and 2 tablespoons unsweetened cocoa powder to the cream cheese. Beat on medium speed for another 1 to 2 minutes until the mixture is silky, uniform in colour, and fully incorporated.
Scrape down the bowl sides and the beaters at least once during mixing. The cocoa powder tends to cling to the sides and will create uneven streaks if not incorporated.
- 7
In a separate clean bowl, whip the cold heavy cream with a hand mixer on high speed for 2 to 3 minutes until stiff peaks form.
Cold bowl and cold beaters whip cream significantly faster. Pop your mixing bowl and beaters in the freezer for 5 to 10 minutes before whipping — especially important in a warm kitchen. Stop the moment you reach firm, glossy stiff peaks; over-whipped cream turns grainy.
- 8
Using a large silicone spatula, gently fold the whipped cream into the cream cheese mixture in three additions. Use slow, sweeping motions from the bottom of the bowl upward to preserve as much air as possible. Stop folding as soon as no white streaks remain.
Folding rather than stirring is what keeps the filling light and airy. Over-mixing at this stage will deflate the whipped cream and produce a denser, heavier texture.
- 9
Add the 8 roughly crushed keto chocolate sandwich cookies to the filling and fold gently two or three times — you want visible chunks of cookie distributed throughout, not fully mixed in.
Leaving larger, irregular pieces of cookie creates that classic Oreo cheesecake look and texture. Fold only two or three times — you want chunks distributed through the filling, not a uniform grey batter.
- 10
Remove the crust from the freezer. Spoon the filling onto the crust and spread it into an even layer using an offset spatula or the back of a large spoon. Smooth the top as evenly as possible.
An offset spatula is the best tool for smoothing the top of the filling. Work from the centre outward in gentle strokes for a flat, professional-looking surface.
- 11
Scatter the finely crushed keto cookies evenly over the top of the cheesecake. Cover the pan loosely with plastic wrap and refrigerate for a minimum of 4 hours, or overnight for the best set and flavour.
Overnight chilling produces a noticeably firmer, more sliceable texture with a deeper, more developed flavour — worth the wait whenever time allows. Cover loosely so condensation does not drip back onto the surface.
- 12
To serve, run a thin knife around the inner edge of the springform pan before releasing the clasp. Carefully lift away the ring, then use a sharp knife wiped clean between each cut to slice the cheesecake into 12 even portions. Serve chilled.
Dip your knife in hot water and wipe it completely dry before each and every slice. This single step is the difference between a clean, bakery-quality cut and a smeared, crumbling one.
Nutrition per serving
278kcal
Calories
5g
Protein
9g
Carbs
26g
Fat
3g
Fibre
1g
Sugar
168mg
Sodium
Pro Tips
- ✓
Always use full-fat cream cheese, reduced-fat versions contain more water and added starch, which prevents the filling from setting firmly. Block-style cream cheese works better than the spreadable tub variety for a sliceable result.
- ✓
Sift the powdered erythritol before adding it to the filling. Any undissolved granules will create a gritty, sandy texture in the finished cheesecake that no amount of chilling will fix.
- ✓
Do not over-crush your keto sandwich cookies when folding them into the filling. Aim for a rough, uneven crush with pieces ranging from pea-sized to almond-sized, those visible dark chunks are what give the cheesecake its authentic cookies-and-cream look and bite.
- ✓
To make a showstopping cookies-and-cream ice cream cake, freeze the finished cheesecake for 2 hours after it has set in the fridge. Slice straight from frozen for clean, restaurant-quality cuts, let slices sit 5 minutes before eating.
- ✓
A cold mixing bowl dramatically speeds up whipping time for the heavy cream. Place your bowl and beaters in the freezer for 5 to 10 minutes before whipping, especially in a warm kitchen. The cream should reach stiff peaks in 2 to 3 minutes this way.
- ✓
Dip your slicing knife in hot water and wipe it dry between every single cut. This one step is the difference between a ragged, crumbling slice and a clean, bakery-worthy presentation.
Frequently Asked Questions
Variations
- •
Keto Mint Oreo Cheesecake
Add 0.5 teaspoon of pure peppermint extract to the filling along with a few drops of natural green food colouring for a refreshing mint-chocolate cookies-and-cream version that tastes like a grasshopper pie.
- •
Keto Oreo Cheesecake Bars
Press the crust into a parchment-lined 9x13-inch baking dish, spread the filling evenly, and chill as directed. Once set, lift out using the parchment and slice into 16 bars. Perfect for parties and easy to serve and transport.
- •
Chocolate Drizzle Version
Melt 30g of sugar-free dark chocolate with 1 teaspoon of coconut oil and drizzle over the top of the chilled cheesecake just before serving for an extra layer of chocolate intensity.
- •
Individual Keto Oreo Cheesecake Cups
Divide the crust mixture among 12 silicone muffin cups or ramekins, press firmly, then top with the filling. Chill and serve as individual no-bake cheesecake portions, ideal for meal prepping individual servings.
Substitutions
- •Coconut oil (crust) → Unsalted butter (Melted unsalted butter provides a slightly richer, more traditional crust flavour. Use in a 1:1 substitution.)
- •Heavy whipping cream → Full-fat coconut cream (For a dairy-free version, refrigerate a can of full-fat coconut cream overnight and whip only the solid portion to stiff peaks. The flavour will have a subtle coconut note.)
- •Full-fat cream cheese → Dairy-free cream cheese (Vegan or dairy-free cream cheese alternatives (cashew-based or coconut-based) work well here, though the filling may be slightly softer. Add 1 teaspoon of psyllium husk for extra firmness.)
- •Powdered erythritol → Powdered monk fruit sweetener (Use in a 1:1 ratio. Monk fruit has a slightly cleaner flavour profile with no cooling aftertaste. Blended erythritol-monk fruit products also work seamlessly.)
- •Blanched almond flour → Sunflower seed flour (For a nut-free crust, sunflower seed flour can replace almond flour in a 1:1 ratio. Note that sunflower seed flour may turn the crust slightly green due to a harmless reaction with baking soda, omit any leavening if present and the colour effect is minimal.)
🧊 Storage
Store the cheesecake covered with plastic wrap or in an airtight container in the refrigerator for up to 5 days. Individual slices can be frozen in airtight containers for up to 2 months. Thaw frozen slices in the refrigerator overnight before serving. Do not store at room temperature for more than 2 hours.
📅 Make Ahead
This cheesecake is an ideal make-ahead dessert. Prepare it the day before you plan to serve it, overnight chilling actually improves both the flavour and the texture of the filling. The crust can also be pressed into the pan and frozen up to 3 days in advance; simply add the filling directly from frozen when ready to assemble.
More Keto Desserts Recipes

Keto Salted Caramel Truffles with Almond Butter and Sea Salt
Keto Chocolate Hazelnut Spread Brownies (Fudgy, Low-Carb & Gluten-Free)

Keto Cinnamon Butter Pecan Fat Bombs (No-Bake, 5-Ingredient)